
Have you ever wondered how to find hidden WiFi networks that don’t show up in your normal wireless scan? Network administrators often hide their SSID (Service Set Identifier) thinking it adds a layer of security. It doesn’t.
In this step-by-step tutorial, you’ll learn exactly how to discover hidden WiFi network names using two powerful tools — airodump-ng for passive discovery and mdk4 for active brute force. By the end of this guide, that hidden network won’t be hidden anymore.
Disclaimer: This tutorial is for educational purposes and authorized penetration testing only. Always obtain proper authorization before testing any network you don’t own.
Table of Contents
What Is a Hidden SSID and Why Doesn’t It Work as Security?
Before we jump into the commands, let’s understand what a hidden SSID actually does at the 802.11 protocol level — because once you understand this, you’ll immediately see why it provides zero real security.
When an access point (AP) hides its SSID, it simply broadcasts an empty or null SSID in its beacon frames instead of the real network name. The beacon itself is still there. The AP is still advertising its presence every 100 milliseconds — broadcasting its MAC address, channel, encryption type, and signal strength. The only thing missing is the name.
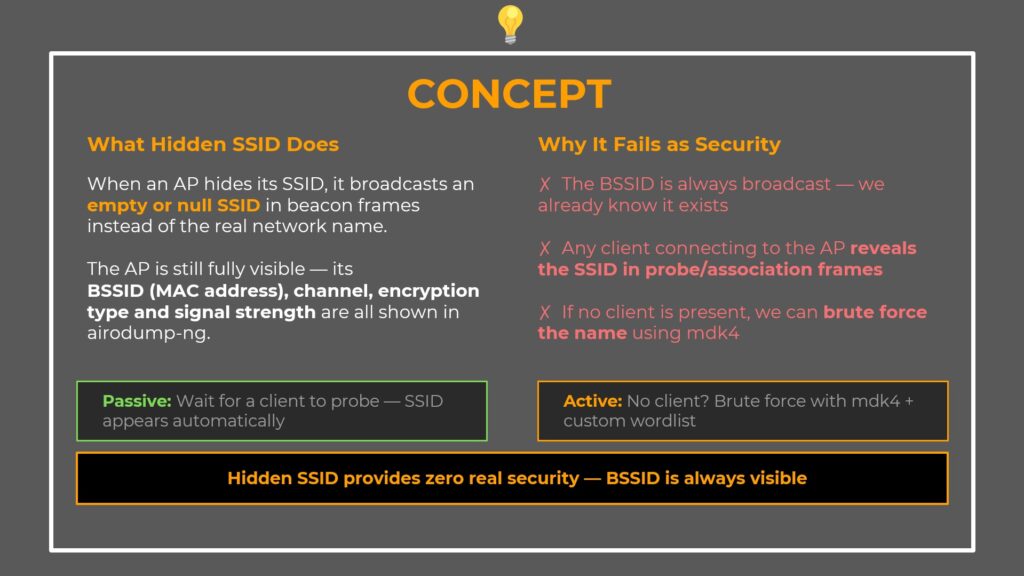
Three Reasons Hidden SSID Fails as Security
1. The BSSID is always broadcast — the AP’s MAC address is visible to anyone scanning. Tools like airodump-ng show it immediately. We already know the network exists.
2. Client connections reveal the SSID — the moment any device connects to the hidden AP, it sends Probe Request and Association Request frames that contain the real SSID. Anyone passively monitoring in monitor mode sees the name instantly.
3. The SSID can be brute forced — if no client is connected, we can send probe requests with every candidate name from a wordlist. When the AP responds, we have the real name.
Two Discovery Methods
Passive method: Wait for a client device to connect to the AP. The SSID appears automatically in probe/association frames. This costs nothing and requires no active attack.
Active method: No clients around? Use mdk4 to brute force the SSID with a custom wordlist.
Prerequisites — What You Need Before Starting
Before you begin finding hidden WiFi networks, make sure you have the following ready:
- Kali Linux (or any Linux distro with the aircrack-ng suite installed)
- Two wireless adapters that support monitor mode (one for passive monitoring, one for active brute forcing)
- aircrack-ng suite (includes airmon-ng and airodump-ng)
- mdk4 (pre-installed on Kali Linux)
- A wordlist (such as the 10-million-password-list or rockyou.txt)
Step 1 — Enable Monitor Mode and Scan All Bands
The first step is to put your wireless adapter into monitor mode and perform a full scan across both 2.4 GHz and 5 GHz bands. Hidden APs are often configured on the 5 GHz band, so scanning all bands is critical.
Enable Monitor Mode
sudo airmon-ng start wlan0Run the Full Scan
sudo airodump-ng wlan0mon -w ~/wifi/scan --manufacturer --wps --band abgHere’s what each flag does:
-w ~/wifi/scan— Write captured packets to ~/wifi/ with the prefix “scan”--manufacturer— Show AP vendor based on MAC address OUI lookup--wps— Display WPS status, useful for spotting extra attack surfaces--band abg— Scan both 2.4 GHz (b/g) and 5 GHz (a) bands
Identify the Hidden Network
Look at the airodump-ng output and find the network with <length: 0> in the ESSID column. That’s your hidden AP.
BSSID              PWR  CH  ENC    ESSID
F0:9F:C2:6A:88:26  -55  11  WPA2   <length: 0>       ← hidden SSID
F0:9F:C2:11:0A:24  -48   6  WPA3   wifi-management
Note down the BSSID (F0:9F:C2:6A:88:26) and the channel (11) — you’ll need both for the next steps.

Step 2 — Lock to the Target Channel (Passive Discovery)
Now lock airodump-ng to channel 11 for a focused capture on the hidden AP.
sudo airodump-ng wlan0mon -w ~/wifi/scanc11 --manufacturer --wps -c 11Watch for Passive SSID Reveal
Keep an eye on the bottom section of the airodump-ng output — that’s where connected clients appear. If any device connects to the hidden AP while you’re monitoring, the SSID reveals itself automatically.
Here’s why this works:
- Probe Request frames (sent from client to AP) contain the SSID the client is looking for
- Association Response frames (sent from AP to client) also contain the real SSID
Your monitor mode interface captures all of these. The <length: 0> disappears and the real network name appears in the ESSID column.
Wait for a minute or two. If a client connects — you’re done. No active attack needed. If nothing appears — proceed to the active brute force in the next steps.
Step 3 — Build a Smart Custom Wordlist
This is where intelligence-driven recon makes the difference between a fast hit and a very long wait.
Analyze the Naming Pattern
Look at what you already know from the initial scan. In our example, all visible networks follow the same naming convention — wifi-IT, wifi-management, wifi-offices. Every single one starts with wifi-. The hidden AP almost certainly follows the same pattern.
Instead of throwing a raw wordlist at mdk4, we prepend wifi- to every entry.
Create the Prefixed Wordlist
cat ~/10-million-password-list-top-100000.txt | awk '{print "wifi-" $1}' > ~/wifi-rockyou.txtBreaking this command down:
- cat — reads the original wordlist line by line
- awk ‘{print “wifi-” $1}’ — processes each line and prepends
wifi-to every word (sofreebecomeswifi-free,adminbecomeswifi-admin) - > ~/wifi-rockyou.txt — writes the output to a new file
Verify the Wordlist
head -5 ~/wifi-rockyou.txtExpected output:
wifi-123456
wifi-password
wifi-12345678
wifi-qwerty
wifi-free
A hundred thousand candidates, all correctly prefixed. That’s your attack list.
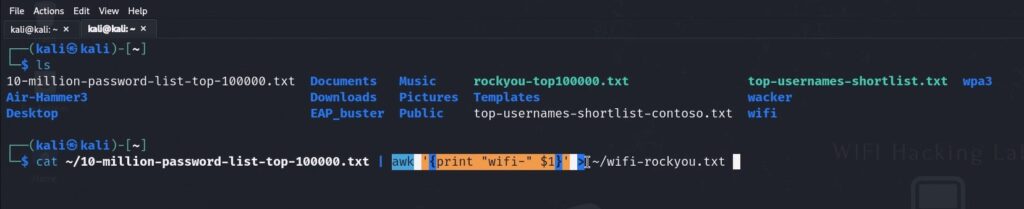
Pro Tip: Without the correct prefix, every single candidate would fail immediately. The AP only responds to its exact SSID name. Intelligence-driven wordlists are dramatically faster than blind ones. If you don’t know the naming pattern, use the raw wordlist without a prefix — it takes longer but still works.
Step 4 — Set Up the Second Wireless Adapter
You need a second wireless adapter for the mdk4 brute force attack. Here’s why:
- wlan0mon is already running airodump-ng on channel 11, passively watching. Keep it running — if a client connects during the mdk4 attack, you’ll catch the SSID passively without needing mdk4 to succeed.
- wlan1mon is dedicated to mdk4. It’s the active attacker that sends probe requests and listens for the AP to respond.
Enable Monitor Mode on the Second Adapter
sudo airmon-ng start wlan1Lock It to Channel 11
iwconfig wlan1mon channel 11This is critical — if the adapter is channel hopping, it won’t be on channel 11 when the AP responds and you’ll miss the hit.
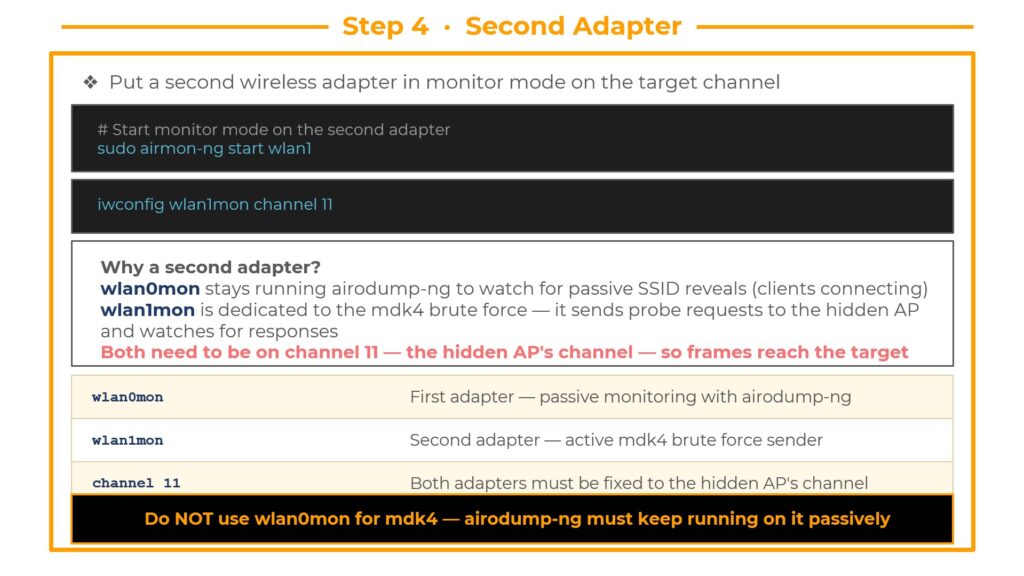
Warning: Do NOT use wlan0mon for mdk4. If you point mdk4 at wlan0mon, it will interrupt airodump-ng’s passive capture. Keep the two interfaces separate — wlan0mon monitors, wlan1mon attacks.
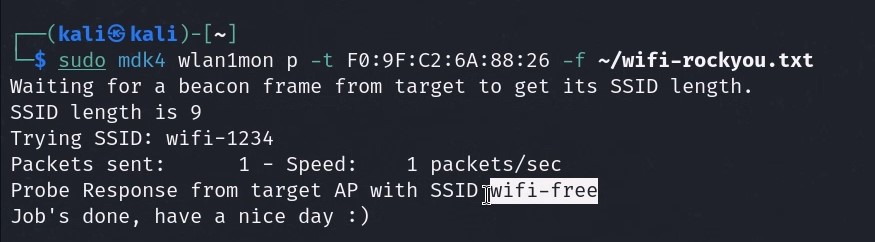
Step 5 — Launch the mdk4 Brute Force Attack
This is where the hidden SSID gets revealed. Launch mdk4 in probe mode against the target BSSID with your custom wordlist.
mdk4 wlan1mon p -t F0:9F:C2:6A:88:26 -f ~/wifi-rockyou.txtCommand Breakdown
wlan1mon— The second monitor mode interfacep— Probe mode, sends 802.11 Probe Request frames using each SSID from the wordlist-t F0:9F:C2:6A:88:26— Target BSSID, directs every probe at this specific AP-f ~/wifi-rockyou.txt— The custom wifi-prefixed wordlist
How Probe Mode Works
mdk4 sends a Probe Request frame for each candidate SSID in the wordlist. The AP only responds to probe requests that match its real SSID. When the AP replies — you’ve found the name.
The Result
┌──(kali㉿kali)-[~]
└─$ mdk4 wlan1mon p -t F0:9F:C2:6A:88:26 -f ~/wifi-rockyou.txt
Trying: wifi-123456
Trying: wifi-password
Trying: wifi-free
FOUND SSID: wifi-free for F0:9F:C2:6A:88:26 on channel: 11
The hidden SSID is wifi-free. The AP gave itself away the moment we sent a probe request with the correct name. It responded as normal — and mdk4 caught it.
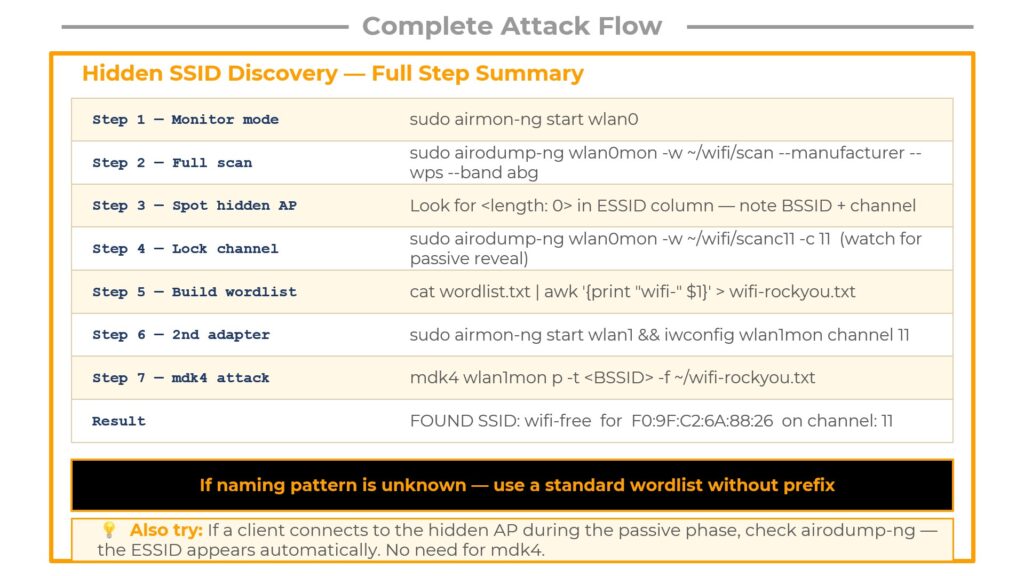
Complete Attack Flow — Quick Reference Cheat Sheet
Here’s the entire hidden SSID discovery process summarized in seven steps:
Step 1 — Monitor mode: sudo airmon-ng start wlan0
Step 2 — Full scan: sudo airodump-ng wlan0mon -w ~/wifi/scan --manufacturer --wps --band abg
Step 3 — Spot hidden AP: Look for <length: 0> in the ESSID column. Note the BSSID and channel.
Step 4 — Lock channel: sudo airodump-ng wlan0mon -w ~/wifi/scanc11 -c 11 (watch for passive reveal)
Step 5 — Build wordlist: cat wordlist.txt | awk '{print "wifi-" $1}' > wifi-rockyou.txt
Step 6 — Second adapter: sudo airmon-ng start wlan1 && iwconfig wlan1mon channel 11
Step 7 — mdk4 attack: mdk4 wlan1mon p -t <BSSID> -f ~/wifi-rockyou.txt
Result: FOUND SSID: wifi-free for F0:9F:C2:6A:88:26 on channel: 11
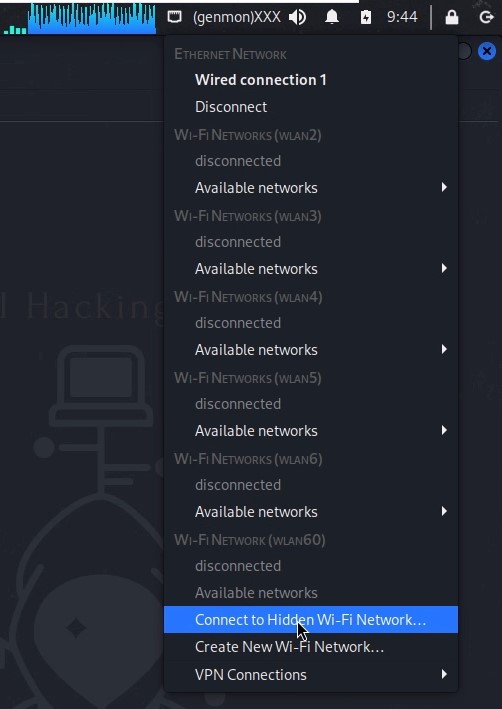
Bonus — How to Connect to the Hidden Network After Discovery
Once you’ve discovered the hidden SSID, connecting is straightforward:
Click the networking icon in the top right toolbar of your desktop. Select “Connect to a Hidden Wi-Fi Network”. Enter the discovered SSID name (wifi-free), select your wireless adapter and the correct security parameters (WPA2 in our case), and click Connect.
You’re now connected to the previously hidden network.
Key Takeaways
Always start with recon. Watch passively first. If a client device shows up and connects to the hidden AP, the SSID reveals itself for free — no attack required.
Only move to active mdk4 brute forcing when the passive approach yields nothing. And when you do go active, let the naming patterns you observed during recon guide your wordlist. The difference between a smart prefixed wordlist and a blind raw wordlist is the difference between seconds and hours.
Hidden SSID is security theater. It hides the network name from casual users, but provides zero protection against anyone with basic wireless security knowledge and the right tools.
Frequently Asked Questions
Is hiding an SSID a good security practice?
No. Hiding your SSID provides no meaningful security. The access point’s MAC address (BSSID), channel, encryption type, and signal strength are all still broadcast in every beacon frame. The name can be discovered passively or brute forced actively in minutes.
Do I need two wireless adapters?
For this specific attack flow, yes. One adapter runs airodump-ng for passive monitoring while the second runs mdk4 for active brute forcing. If you only have one adapter, you can run the passive and active phases sequentially instead of simultaneously.
What if I don’t know the naming pattern for the wordlist?
Use a standard wordlist without any prefix. It will take longer to cycle through candidates, but mdk4 will still find the SSID if it’s in your wordlist. The prefix optimization is based on intelligence gathered during recon — it’s helpful but not required.
Does this work on WPA3 networks?
Yes. Hidden SSID discovery is independent of the encryption protocol. Whether the AP uses WPA2 or WPA3, the SSID brute force technique works the same way because it targets the probe request/response mechanism, not the encryption layer.
Learn More
This tutorial is part of the complete WiFi Hacking course at wifi-hacking.cavementech.com. The course covers WPA2 cracking, WPA3 vulnerabilities, deauthentication attacks, evil twin setups, and much more.
Best WIFI Adapters for WIFI hacking
If you are looking to pentest real world physical WIFI networks, you can choose one of these wifi adapters.
- AWUS036ACH– New USB C type – $60
- Alfa AWUS036ACM – Long Range dual band – $70
- BrosTrend 650Mbps– Economical Does the Job- $20
- ALFA Network AWUS036ACS – Best in its Price Range -$25
- Alfa AC1200 – Supports both 2.4 GHz and 5 GHz, bands – $58